Recherche avancée

Autres articles (81)
-
List of compatible distributions
26 avril 2011, parThe table below is the list of Linux distributions compatible with the automated installation script of MediaSPIP. Distribution nameVersion nameVersion number Debian Squeeze 6.x.x Debian Weezy 7.x.x Debian Jessie 8.x.x Ubuntu The Precise Pangolin 12.04 LTS Ubuntu The Trusty Tahr 14.04
If you want to help us improve this list, you can provide us access to a machine whose distribution is not mentioned above or send the necessary fixes to add (...) -
Amélioration de la version de base
13 septembre 2013Jolie sélection multiple
Le plugin Chosen permet d’améliorer l’ergonomie des champs de sélection multiple. Voir les deux images suivantes pour comparer.
Il suffit pour cela d’activer le plugin Chosen (Configuration générale du site > Gestion des plugins), puis de configurer le plugin (Les squelettes > Chosen) en activant l’utilisation de Chosen dans le site public et en spécifiant les éléments de formulaires à améliorer, par exemple select[multiple] pour les listes à sélection multiple (...) -
Emballe médias : à quoi cela sert ?
4 février 2011, parCe plugin vise à gérer des sites de mise en ligne de documents de tous types.
Il crée des "médias", à savoir : un "média" est un article au sens SPIP créé automatiquement lors du téléversement d’un document qu’il soit audio, vidéo, image ou textuel ; un seul document ne peut être lié à un article dit "média" ;
Sur d’autres sites (7842)
-
Dreamcast SD Adapter and DreamShell
31 décembre 2014, par Multimedia Mike — Sega DreamcastNope ! I’m never going to let go of the Sega Dreamcast hacking. When I was playing around with Dreamcast hacking early last year, I became aware that there is such a thing as an SD card adapter for the DC that plugs into the port normally reserved for the odd DC link cable. Of course I wanted to see what I could do with it.
The primary software that leverages the DC SD adapter is called DreamShell. Working with this adapter and the software requires some skill and guesswork. Searching for these topics tends to turn up results from various forums where people are trying to cargo-cult their way to solutions. I have a strange feeling that this post might become the unofficial English-language documentation on the matter.
Use Cases
What can you do with this thing ? Undoubtedly, the primary use is for backing up (ripping) the contents of GD-ROMs (the custom optical format used for the DC) and playing those backed up (ripped) copies. Presumably, users of this device leverage the latter use case more than the former, i.e., download ripped games, load them on the SD card, and launch them using DreamShell.However, there are other uses such as multimedia playback, system exploration, BIOS reprogramming, high-level programming, and probably a few other things I haven’t figured out yet.
Delivery
I put in an order via the dc-sd.com website and in about 2 short months, the item arrived from China. This marked my third lifetime delivery from China and curiously, all 3 of the shipments have pertained to the Sega Dreamcast.

Click for larger image
I thought it was very interesting that this adapter came in such complete packaging. The text is all in Chinese, though the back states “Windows 98 / ME / 2000 / XP, Mac OS 9.1, LINUX2.4”. That’s what tipped me off that they must have just cannibalized some old USB SD card readers and packaging in order to create these. Closer inspection of the internals through the translucent pink case confirms this.
Usage
According to its change log, DreamShell has been around for a long time with version 1.0.0 released in February of 2004. The current version is 4.0.0 RC3. There are several downloads available :- DreamShell 4.0 RC 3 CDI Image
- DreamShell 4.0 RC 3 + Boot Loader
- DreamShell 4.0 RC 3 + Core CDI image
Option #2 worked for me. It contains a CDI disc image and the DreamShell files in a directory named DS/.
Burn the CDI to a CD-R in the normal way you would burn a bootable Dreamcast disc from a CDI image. This is open-ended and left as an exercise to the reader, since there are many procedures depending on platform. On Linux, I used a small script I found once called burncdi-dc.sh.
Then, copy the contents of the DS/ folder to an SD card. As for filesystem, FAT16 and FAT32 are both known to work. The files in DS/ should land in the root of the SD card ; the folder DS/ should not be in the root.
Plug the SD card into the DC SD adapter and plug the adapter in the link cable port on the back of the Dreamcast. Then, boot the disc. If it works, you will see this minor corruption of the usual Sega licensing screen :

Then, there will be a brief white-on-black text screen that explains the booting process :

Then, there will be the main DreamShell logo :

Finally, you will land on the DreamShell main desktop :

Skepticism
At first, I was supremely skeptical of the idea that this SD adapter could perform speedily enough to play games reasonably. This was predicated on the observation that my DC coder’s cable that I used to use for homebrew development could not transfer faster than 115200 bits/second, amounting to about 11 kbytes/sec. I assumed that this was a fundamental limitation of the link port.In fact, I ripped a few of my Dreamcast discs over a decade ago and still have those rips lying around. So I copied the ISO image of Resident Evil : Code Veronica — the game I personally played most on the DC — to the SD card (anywhere works) and used the “ISO loader” icon seen on the desktop above to launch the game.
It works :

The opening FMV plays at full speed. Everything loads as fast as I remember. I was quite surprised.
Digression : My assumptions about serial speeds have often been mistaken. 10 years ago, I heard stories about how we would soon be able to watch streaming video on our cell phones. I scoffed because I thought the 56K limitation of dialup modems was some sort of fundamental speed-of-light type of limitation for telephony bandwidth, wired or wireless.
The desktop menu also includes a ‘speedtest’ tool that profiles the write and read performance of your preferred storage medium. For my fastest SD card (a PNY 2 GB card) :

This is probably more representative of the true adapter bandwidth as reading and writing is a good deal faster through more modern interfaces on PC and Mac with this same card.
Look at the other options on the speedtest console. Hard drive ? Apparently, it’s possible, but it requires a good deal more hardware hacking than just purchasing this SD adapter.
Ripping
As you can see from the Resident Evil screenshot, playing games works quite nicely. How about ripping ? I’m pleased to say that DreamShell has a beautiful ripping interface :

Enter a name for the disc (or read the disc label), select the storage medium, and let it, well, rip. It indicates which track it’s working on and the Sega logo acts as a progress bar, shading blue as the track rip progresses.
I’m finally, efficiently, archiving that collection of Sega Dreamcast demo discs ; I’m hoping they’ll eventually find a home at the Internet Archive. How is overall ripping performance ? Usually about 38-40 minutes to rip a full 900-1000 MB. That certainly beats the 27-28 hours that were required when I performed the ripping at 11 kbytes/sec via the DC coders cable.
All is well until I get a sector reading error :

That’s when it can come in handy to have 3 DC consoles (see ?! not crazy !).
Other Uses
There’s a file explorer. You can browse the filesystem of the SD card, visual memory unit, or the CD portion of the GD-ROM (would be more useful if it accessed the GD area). There are FFmpeg files included. So I threw a random Cinepak file and random MPEG-1 file at it to see what happens. MPEG-1 didn’t do anything, but this Cinepak file from some Sierra game played handily :

If you must enter strings, it helps to have a Dreamcast keyboard (which I do). Failing that, here’s a glimpse of the onscreen keyboard that DreamShell equips :

Learning to use it is a game in itself.
There is an option of installing DreamShell in the BIOS. I did not attempt this. I don’t know if it’s possible (not like there’s a lot of documentation)– perhaps a custom BIOS modchip is needed. But here’s what the screen looks like :

There is also a plain console to interact with (better have a physical keyboard). There are numerous file manipulation commands and custom system interaction commands. I see one interesting command called ‘addr’ that looks useful for dumping memory regions to a file.
A Lua language interpreter is also built in. I would love to play with this if I could ascertain whether DreamShell provided Dreamcast-specific APIs.
Tips And Troubleshooting
I have 3 Dreamcast consoles, affectionately named Terran, Protoss, and Zerg after the StarCraft II stickers with which they are adorned. Some seem to work better than others. Protoss seemed to be able to boot the DreamShell disc more reliably than the others. However, I was alarmed when it couldn’t boot one morning when it was churning the previous day.I think the problem is that it was just cold. That seemed to be the issue. I put in a normal GD-ROM and let it warm up on that disc for awhile and then DreamShell booted fine. So that’s my piece of cargo-culting troubleshooting advice.
-
Dreamcast SD Adapter and DreamShell
31 décembre 2014, par Multimedia Mike — Sega DreamcastNope ! I’m never going to let go of the Sega Dreamcast hacking. When I was playing around with Dreamcast hacking early last year, I became aware that there is such a thing as an SD card adapter for the DC that plugs into the port normally reserved for the odd DC link cable. Of course I wanted to see what I could do with it.
The primary software that leverages the DC SD adapter is called DreamShell. Working with this adapter and the software requires some skill and guesswork. Searching for these topics tends to turn up results from various forums where people are trying to cargo-cult their way to solutions. I have a strange feeling that this post might become the unofficial English-language documentation on the matter.
Use Cases
What can you do with this thing ? Undoubtedly, the primary use is for backing up (ripping) the contents of GD-ROMs (the custom optical format used for the DC) and playing those backed up (ripped) copies. Presumably, users of this device leverage the latter use case more than the former, i.e., download ripped games, load them on the SD card, and launch them using DreamShell.However, there are other uses such as multimedia playback, system exploration, BIOS reprogramming, high-level programming, and probably a few other things I haven’t figured out yet.
Delivery
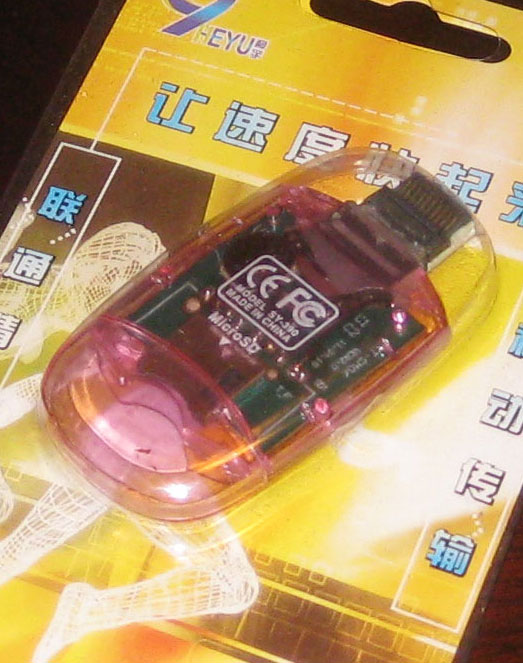
I put in an order via the dc-sd.com website and in about 2 short months, the item arrived from China. This marked my third lifetime delivery from China and curiously, all 3 of the shipments have pertained to the Sega Dreamcast.
Click for larger image
I thought it was very interesting that this adapter came in such complete packaging. The text is all in Chinese, though the back states “Windows 98 / ME / 2000 / XP, Mac OS 9.1, LINUX2.4”. That’s what tipped me off that they must have just cannibalized some old USB SD card readers and packaging in order to create these. Closer inspection of the internals through the translucent pink case confirms this.
Usage
According to its change log, DreamShell has been around for a long time with version 1.0.0 released in February of 2004. The current version is 4.0.0 RC3. There are several downloads available :- DreamShell 4.0 RC 3 CDI Image
- DreamShell 4.0 RC 3 + Boot Loader
- DreamShell 4.0 RC 3 + Core CDI image
Option #2 worked for me. It contains a CDI disc image and the DreamShell files in a directory named DS/.
Burn the CDI to a CD-R in the normal way you would burn a bootable Dreamcast disc from a CDI image. This is open-ended and left as an exercise to the reader, since there are many procedures depending on platform. On Linux, I used a small script I found once called burncdi-dc.sh.
Then, copy the contents of the DS/ folder to an SD card. As for filesystem, FAT16 and FAT32 are both known to work. The files in DS/ should land in the root of the SD card ; the folder DS/ should not be in the root.
Plug the SD card into the DC SD adapter and plug the adapter in the link cable port on the back of the Dreamcast. Then, boot the disc. If it works, you will see this minor corruption of the usual Sega licensing screen :
Then, there will be a brief white-on-black text screen that explains the booting process :
Then, there will be the main DreamShell logo :
Finally, you will land on the DreamShell main desktop :
Skepticism
At first, I was supremely skeptical of the idea that this SD adapter could perform speedily enough to play games reasonably. This was predicated on the observation that my DC coder’s cable that I used to use for homebrew development could not transfer faster than 115200 bits/second, amounting to about 11 kbytes/sec. I assumed that this was a fundamental limitation of the link port.In fact, I ripped a few of my Dreamcast discs over a decade ago and still have those rips lying around. So I copied the ISO image of Resident Evil : Code Veronica — the game I personally played most on the DC — to the SD card (anywhere works) and used the “ISO loader” icon seen on the desktop above to launch the game.
It works :
The opening FMV plays at full speed. Everything loads as fast as I remember. I was quite surprised.
Digression : My assumptions about serial speeds have often been mistaken. 10 years ago, I heard stories about how we would soon be able to watch streaming video on our cell phones. I scoffed because I thought the 56K limitation of dialup modems was some sort of fundamental speed-of-light type of limitation for telephony bandwidth, wired or wireless.
The desktop menu also includes a ‘speedtest’ tool that profiles the write and read performance of your preferred storage medium. For my fastest SD card (a PNY 2 GB card) :
This is probably more representative of the true adapter bandwidth as reading and writing is a good deal faster through more modern interfaces on PC and Mac with this same card.
Look at the other options on the speedtest console. Hard drive ? Apparently, it’s possible, but it requires a good deal more hardware hacking than just purchasing this SD adapter.
Ripping
As you can see from the Resident Evil screenshot, playing games works quite nicely. How about ripping ? I’m pleased to say that DreamShell has a beautiful ripping interface :
Enter a name for the disc (or read the disc label), select the storage medium, and let it, well, rip. It indicates which track it’s working on and the Sega logo acts as a progress bar, shading blue as the track rip progresses.
I’m finally, efficiently, archiving that collection of Sega Dreamcast demo discs ; I’m hoping they’ll eventually find a home at the Internet Archive. How is overall ripping performance ? Usually about 38-40 minutes to rip a full 900-1000 MB. That certainly beats the 27-28 hours that were required when I performed the ripping at 11 kbytes/sec via the DC coders cable.
All is well until I get a sector reading error :
That’s when it can come in handy to have 3 DC consoles (see ?! not crazy !).
Other Uses
There’s a file explorer. You can browse the filesystem of the SD card, visual memory unit, or the CD portion of the GD-ROM (would be more useful if it accessed the GD area). There are FFmpeg files included. So I threw a random Cinepak file and random MPEG-1 file at it to see what happens. MPEG-1 didn’t do anything, but this Cinepak file from some Sierra game played handily :
If you must enter strings, it helps to have a Dreamcast keyboard (which I do). Failing that, here’s a glimpse of the onscreen keyboard that DreamShell equips :
Learning to use it is a game in itself.
There is an option of installing DreamShell in the BIOS. I did not attempt this. I don’t know if it’s possible (not like there’s a lot of documentation)– perhaps a custom BIOS modchip is needed. But here’s what the screen looks like :
There is also a plain console to interact with (better have a physical keyboard). There are numerous file manipulation commands and custom system interaction commands. I see one interesting command called ‘addr’ that looks useful for dumping memory regions to a file.
A Lua language interpreter is also built in. I would love to play with this if I could ascertain whether DreamShell provided Dreamcast-specific APIs.
Tips And Troubleshooting
I have 3 Dreamcast consoles, affectionately named Terran, Protoss, and Zerg after the StarCraft II stickers with which they are adorned. Some seem to work better than others. Protoss seemed to be able to boot the DreamShell disc more reliably than the others. However, I was alarmed when it couldn’t boot one morning when it was churning the previous day.I think the problem is that it was just cold. That seemed to be the issue. I put in a normal GD-ROM and let it warm up on that disc for awhile and then DreamShell booted fine. So that’s my piece of cargo-culting troubleshooting advice.
-
How to increase engagement and convert them into customers
8 septembre 2020, par Joselyn Khor — Analytics Tips, MarketingLong gone are the days of simply tracking page views as a measure of engagement. Now it’s about engagement analysis, which is layered and provides insight for effective data-driven decisions.
Discover how engaged people are with your website by uncovering behavioural patterns that tell you how well your site and content is or isn’t performing. This insight helps you re-evaluate, adapt and optimise your content and strategy. The more engaged they are, the more likely you’ll be able to guide them on a predetermined journey that results in more conversions ; and helps you reach the goals you’ve set for your business.
Why is visitor engagement important ?
It’s vital to measure engagement if you have anything content related that plays a role in your customer’s journey. Some websites may find more value in figuring out how engaging their entire site is, while others may only want to zone in on, say, a blogging section, e-newsletters, social media channels or sign-up pages.
In the larger scheme of things, engagement can be seen as what’s running your site. Every aspect of the buyer’s journey requires your visitors to be engaged. Whether you’re trying to attract, convert or build a loyal audience base, you need to know your content is optimised to maintain their attention and encourage them along the path to purchase, conversion or loyalty.
How to increase engagement with Matomo
You need to know what’s going right or wrong to eventually be able to deliver more riveting content your visitors can’t help but be drawn to. Learn how to apply Matomo’s easy-to-use features to increase engagement :
- The Behaviour feature
- Heatmaps
- A/B Testing
- Media Analytics
- Transitions
- Custom reports
- Other metrics to keep an eye on
1. Look at the Behaviour feature
It allows you to learn how visitors are responding to your content. This information is gathered by drawing insight from features such as site search, downloads, events and content interactions. Learn more

Matomo’s top five ways to increase engagement with the Behaviour feature :
Behaviour -> Pages
Get complete insights on what pages your users engage with, what pages provide little value to your business and see the results of entry and exit pages. If important content is generating low traffic, you need to place it where it can be seen. Spend time where it matters and focus on the content that will engage with your users and see how it eventually converts them into customers.Behaviour -> Site search
Site search tracks how people use your website’s internal search engine. You can see :- What search keywords visitors used on your website’s internal search.
- Which of those keywords resulted in no results (what content your visitors are looking for but cannot find).
- What pages visitors visited immediately after a search.
- What search categories visitors use (if your website employs search categories).
Behaviour -> Downloads
What are users wanting to take away with them ? They could be downloading .pdfs, .zip files, ebooks, infographics or other free/paid resources. For example, if you were working for an education institution and created valuable information packs for students that you made available online in .pdf format. To see an increase in downloads meant students were finding the .pdfs and realising the need to download them. No downloads could mean the information packs weren’t being found which would be problematic.Behaviour -> Events
Tracking events is a very useful way to measure the interactions your users have with your website content, which are not directly page views or downloads.How have Events been used effectively ? A great example comes from one of our customers, Catalyst. They wanted to capture and measure the user interaction of accordions (an area of content that expands or closes depending on how a user interacts with it) to see if people were actually getting all the information available to them on this one page. By creating an Event to record which accordion had been opened, as well as creating events for other user interactions, they were able to figure out which content got the most engagement and which got the least. Being able to see how visitors navigated through their website helped them optimise the site to ensure people were getting the relevant information they were craving.
Behaviour -> Content interactions
Content tracking allows you to track interaction within the content of your web page. Go beyond page views, bounce rates and average time spent on page with your content. Instead, you can analyse content interaction rates based on mouse clicking and configuring scrolling or hovering behaviours to see precisely how engaged your users are. If interaction rates are low, perhaps you need to restructure your page layout to grab your user’s attention sooner. Possibly you will get more interaction when you have more images or banner ads to other areas of your business.
Watch this video to learn about the Behaviour feature
2. Set up Heatmaps
Effortlessly discover how your visitors truly engage with your most important web pages that impact the success of your business. Heatmaps shows you visually where your visitors try to click, move the mouse and how far down they scroll on each page.

You don’t need to waste time digging for key metrics or worry about putting together tables of data to understand how your visitors are interacting with your website. Heatmaps make it easy and fast to discover where your users are paying their attention, where they have problems, where useless content is and how engaging your content is. Get insights that you cannot get from traditional reports. Learn more
3. Carry out A/B testing
With A/B Testing you reduce risk in your decision-making and can test what your visitors are responding well to.

Ever had discussions with colleagues about where to place content on a landing page ? Or discussed what the call-to-action should be and assumed you were making the best decisions ? The truth is, you never know what really works the best (and what doesn’t) unless you test it. Learn more
How to increase engagement with A/B Testing : Test, test and test. This is a surefire way to learn what content is leading your visitors on a path to conversion and what isn’t.
4. Media Analytics
Tells you how visitors are engaging with your video or audio content, and whether they’re leading to your desired conversions. Track :
- How many plays your media gets and which parts they viewed
- Finish rates
- How your media was consumed over time
- How media was consumed on specific days
- Which locations your users were viewing your content from
- Learn more

How to increase engagement with Media Analytics : These metrics give a picture of how audiences are behaving when it comes to your content. By showing insights such as, how popular your media content is, how engaging it is and which days content will be most viewed, you can tailor content strategies to produce content people will actually find interesting and watch/listen.
Matomo example : When we went through the feature video metrics on our own site to see how our videos were performing, we noticed our Acquisition video had a 95% completion rate. Even though it was longer than most videos, the stats showed us it had, by far, the most engagement. By using Media Analytics to get insights on the best and worst performing videos, we gathered useful info to help us better allocate resources effectively so that in the future, we’re producing more videos that will be watched.
5. Investigate transitions
See which page visitors are entering the site from and where they exit to. Transitions shows engagement on each page and whether the content is leading them to the pages you want them to be directed to.

This gives you a greater understanding of user pathways. You may be assuming visitors are finding your content from one particular pathway, but figure out users are actually coming through other channels you never thought of. Through Transitions, you may discover and capitalise on new opportunities from external sites.
How to increase engagement with Transitions : Identify clearly where users may be getting distracted to click away and where other pages are creating opportunity to click-through to conversion.
6. Create Custom Reports
You can choose from over 200 dimensions and metrics to get the insights you need as well as various visualisation options. This makes understanding the data incredibly easy and you can get the insights you need instantly for faster results without the need for a developer. Learn more

How to increase engagement with Custom Reports : Set custom reports to see when content is being viewed and figure out how engaged users are by looking at different hours of the day or which days of the week they’re visiting your website. For example, you could be wondering what hour of the day performed best for converting your customers. Understanding these metrics helps you figure out the best time to schedule your blog posts, pay-per-click advertising, edms or social media posts knowing that your visitors are more likely to convert at different times.
7. Other metrics to key an eye on …
A good indication of a great experience and of engagement is whether your readers, viewers or listeners want to do it again and again.
“Best” metrics are hard to determine so you’ll need to ask yourself what you want to do or what you want your site to do. How do you want your users to behave or what kind of buyer’s journey do you want them to have ?
Want to know where to start ? Look at …
- Bounce rate – a high bounce rate isn’t great as people aren’t finding what they’re looking for and are leaving without taking action. (This offers great opportunities as you can test to see why people are bouncing off your site and figure out what you need to change.)
- Time on site – a long time on site is usually a good indication that people are spending time reading, navigating and being engaged with your website.
- Frequency of visit – how often do people come back to interact with the content on your website ? The higher the % of your visitors that come back time and time again will show how engaged they are with your content.
- Session length/average session duration – how much time users spend on site each session
- Pages per session – is great to show engagement because it shows visitors are happy going through your website and learn more about your business.
Key takeaway
Whichever stage of the buyer’s journey your visitors are in, you need to ensure your content is optimised for engagement so that visitors can easily spend time on your website.
“Every single visit by every single visitor is no longer judged as a success or a failure at the end of 29 min (max) session in your analytics tool. Every visit is not a ‘last-visit’, rather it becomes a continuous experience leading to a win-win outcome.” – Avinash Kaushik
As you can tell, one size does not fit all when it comes to analysing and measuring engagement, but with a toolkit of features, you can make sure you have everything you need to experiment and figure out the metrics that matter to the success of your business and website.
Concurrently, these gentle nudges for visitors to consume more and more content encourages them along their path to purchase, conversion or loyalty. They get a more engaging website experience over time and you get happy visitors/customers who end up coming back for more.
Want to learn how to increase conversions with Matomo ? Look out for the final in this series : part 3 ! We’ll go through how you can boost conversions and meet your business goals with web analytics.