Recherche avancée
Autres articles (20)
-
Amélioration de la version de base
13 septembre 2013Jolie sélection multiple
Le plugin Chosen permet d’améliorer l’ergonomie des champs de sélection multiple. Voir les deux images suivantes pour comparer.
Il suffit pour cela d’activer le plugin Chosen (Configuration générale du site > Gestion des plugins), puis de configurer le plugin (Les squelettes > Chosen) en activant l’utilisation de Chosen dans le site public et en spécifiant les éléments de formulaires à améliorer, par exemple select[multiple] pour les listes à sélection multiple (...) -
MediaSPIP v0.2
21 juin 2013, parMediaSPIP 0.2 is the first MediaSPIP stable release.
Its official release date is June 21, 2013 and is announced here.
The zip file provided here only contains the sources of MediaSPIP in its standalone version.
To get a working installation, you must manually install all-software dependencies on the server.
If you want to use this archive for an installation in "farm mode", you will also need to proceed to other manual (...) -
Organiser par catégorie
17 mai 2013, parDans MédiaSPIP, une rubrique a 2 noms : catégorie et rubrique.
Les différents documents stockés dans MédiaSPIP peuvent être rangés dans différentes catégories. On peut créer une catégorie en cliquant sur "publier une catégorie" dans le menu publier en haut à droite ( après authentification ). Une catégorie peut être rangée dans une autre catégorie aussi ce qui fait qu’on peut construire une arborescence de catégories.
Lors de la publication prochaine d’un document, la nouvelle catégorie créée sera proposée (...)
Sur d’autres sites (6017)
-
How to make your plugin configurable – Introducing the Piwik Platform
18 septembre 2014, par Thomas Steur — DevelopmentThis is the next post of our blog series where we introduce the capabilities of the Piwik platform (our previous post was How to add new pages and menu items to Piwik). This time you will learn how to define settings for your plugin. For this tutorial you will need to have basic knowledge of PHP.
What can I do with settings ?
The Settings API offers you a simple way to make your plugin configurable within the Admin interface of Piwik without having to deal with HTML, JavaScript, CSS or CSRF tokens. There are many things you can do with settings, for instance let users configure :
- connection infos to a third party system such as a WordPress installation.
- select a metric to be displayed in your widget
- select a refresh interval for your widget
- which menu items, reports or widgets should be displayed
- and much more
Getting started
In this series of posts, we assume that you have already set up your development environment. If not, visit the Piwik Developer Zone where you’ll find the tutorial Setting up Piwik.
To summarize the things you have to do to get setup :
- Install Piwik (for instance via git).
- Activate the developer mode :
./console development:enable --full. - Generate a plugin :
./console generate:plugin --name="MySettingsPlugin". There should now be a folderplugins/MySettingsPlugin. - And activate the created plugin under Settings => Plugins.
Let’s start creating settings
We start by using the Piwik Console to create a settings template :
./console generate:settingsThe command will ask you to enter the name of the plugin the settings should belong to. I will simply use the above chosen plugin name “MySettingsPlugin”. There should now be a file
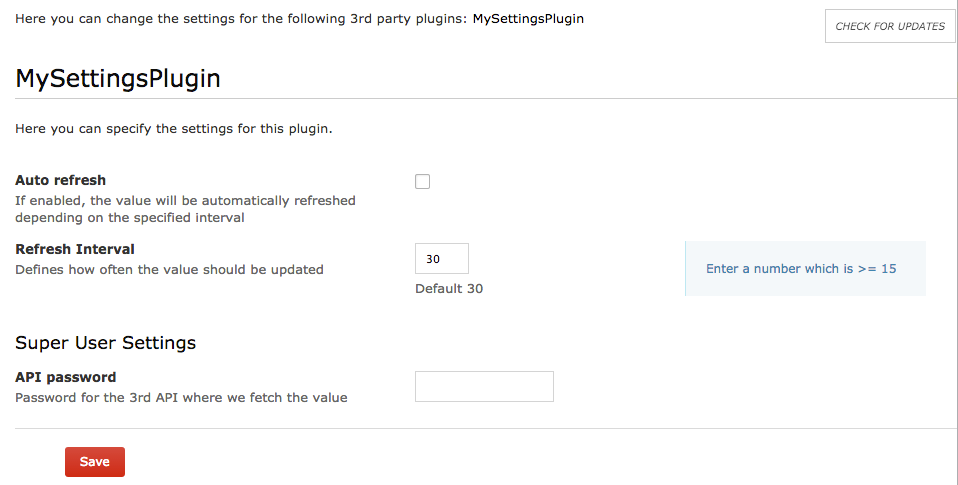
plugins/MySettingsPlugin/Settings.phpwhich contains already some examples to get you started easily. To see the settings in action go to Settings => Plugin settings in your Piwik installation.
Adding one or more settings
Settings are added in the
init()method of the settings class by calling the methodaddSetting()and passing an instance of a UserSetting or SystemSetting object. How to create a setting is explained in the next chapter.Customising a setting
To create a setting you have to define a name along some options. For instance which input field should be displayed, what type of value you expect, a validator and more. Depending on the input field we might automatically validate the values for you. For example if you define available values for a select field then we make sure to validate and store only a valid value which provides good security out of the box.
For a list of possible properties have a look at the SystemSetting and UserSetting API reference.
class Settings extends \Piwik\Plugin\Settings

{

    public $refreshInterval;


    protected function init()

    {

        $this->setIntroduction('Here you can specify the settings for this plugin.');


        $this->createRefreshIntervalSetting();

    }


    private function createRefreshIntervalSetting()

    {

        $this->refreshInterval = new UserSetting('refreshInterval', 'Refresh Interval');

        $this->refreshInterval->type = static::TYPE_INT;

        $this->refreshInterval->uiControlType = static::CONTROL_TEXT;

        $this->refreshInterval->uiControlAttributes = array('size' => 3);

        $this->refreshInterval->description = 'How often the value should be updated';

        $this->refreshInterval->inlineHelp = 'Enter a number which is >= 15';

        $this->refreshInterval->defaultValue = '30';

        $this->refreshInterval->validate = function ($value, $setting) {

            if ($value < 15) {

                throw new \Exception('Value is invalid');

            }

        };


        $this->addSetting($this->refreshInterval);

    }

}
In this example you can see some of those properties. Here we create a setting named “refreshInterval” with the display name “Refresh Interval”. We want the setting value to be an integer and the user should enter this value in a text input field having the size 3. There is a description, an inline help and a default value of 30. The validate function makes sure to accept only integers that are at least 15, otherwise an error in the UI will be shown.

You do not always have to specify a PHP
typeand auiControlType. For instance if you specify a PHP type boolean we automatically display a checkbox by default. Similarly if you specify to display a checkbox we assume that you want a boolean value.Accessing settings values
You can access the value of a setting in a widget, in a controller, in a report or anywhere you want. To access the value create an instance of your settings class and get the value like this :
$settings = new Settings();

$interval = $settings->refreshInterval->getValue()
Type of settings
The Piwik platform differentiates between UserSetting and SystemSetting. User settings can be configured by any logged in user and each user can configure the setting independently. The Piwik platform makes sure that settings are stored per user and that a user cannot see another users configuration.
A system setting applies to all of your users. It can be configured only by a user who has super user access. By default, the value can be read only by a super user as well but often you want to have it readable by anyone or at least by logged in users. If you set a setting readable the value will still be only displayed to super users but you will always be able to access the value in the background.
Imagine you are building a widget that fetches data from a third party system where you need to configure an API URL and token. While no regular user should see the value of both settings, the value should still be readable by any logged in user. Otherwise when logged in users cannot read the setting value then the data cannot be fetched in the background when this user wants to see the content of the widget. Solve this by making the setting readable by the current user :
$setting->readableByCurrentUser = !Piwik::isUserIsAnonymous();Publishing your Plugin on the Marketplace
In case you want to share your settings or your plugin with other Piwik users you can do this by pushing your plugin to a public GitHub repository and creating a tag. Easy as that. Read more about how to distribute a plugin.
Advanced features
Isn’t it easy to create settings for plugins ? We never even created a file ! The Settings API already offers many possibilities but it might not yet be as flexible as your use case requires. So let us know in case you are missing something and we hope to add this feature at some point in the future.
If you have any feedback regarding our APIs or our guides in the Developer Zone feel free to send it to us. -
How to make your plugin configurable – Introducing the Piwik Platform
18 septembre 2014, par Thomas Steur — DevelopmentThis is the next post of our blog series where we introduce the capabilities of the Piwik platform (our previous post was How to add new pages and menu items to Piwik). This time you will learn how to define settings for your plugin. For this tutorial you will need to have basic knowledge of PHP.
What can I do with settings ?
The Settings API offers you a simple way to make your plugin configurable within the Admin interface of Piwik without having to deal with HTML, JavaScript, CSS or CSRF tokens. There are many things you can do with settings, for instance let users configure :
- connection infos to a third party system such as a WordPress installation.
- select a metric to be displayed in your widget
- select a refresh interval for your widget
- which menu items, reports or widgets should be displayed
- and much more
Getting started
In this series of posts, we assume that you have already set up your development environment. If not, visit the Piwik Developer Zone where you’ll find the tutorial Setting up Piwik.
To summarize the things you have to do to get setup :
- Install Piwik (for instance via git).
- Activate the developer mode :
./console development:enable --full. - Generate a plugin :
./console generate:plugin --name="MySettingsPlugin". There should now be a folderplugins/MySettingsPlugin. - And activate the created plugin under Settings => Plugins.
Let’s start creating settings
We start by using the Piwik Console to create a settings template :
./console generate:settingsThe command will ask you to enter the name of the plugin the settings should belong to. I will simply use the above chosen plugin name “MySettingsPlugin”. There should now be a file
plugins/MySettingsPlugin/Settings.phpwhich contains already some examples to get you started easily. To see the settings in action go to Settings => Plugin settings in your Piwik installation.Adding one or more settings
Settings are added in the
init()method of the settings class by calling the methodaddSetting()and passing an instance of a UserSetting or SystemSetting object. How to create a setting is explained in the next chapter.Customising a setting
To create a setting you have to define a name along some options. For instance which input field should be displayed, what type of value you expect, a validator and more. Depending on the input field we might automatically validate the values for you. For example if you define available values for a select field then we make sure to validate and store only a valid value which provides good security out of the box.
For a list of possible properties have a look at the SystemSetting and UserSetting API reference.
class Settings extends \Piwik\Plugin\Settings

{

    public $refreshInterval;


    protected function init()

    {

        $this->setIntroduction('Here you can specify the settings for this plugin.');


        $this->createRefreshIntervalSetting();

    }


    private function createRefreshIntervalSetting()

    {

        $this->refreshInterval = new UserSetting('refreshInterval', 'Refresh Interval');

        $this->refreshInterval->type = static::TYPE_INT;

        $this->refreshInterval->uiControlType = static::CONTROL_TEXT;

        $this->refreshInterval->uiControlAttributes = array('size' => 3);

        $this->refreshInterval->description = 'How often the value should be updated';

        $this->refreshInterval->inlineHelp = 'Enter a number which is >= 15';

        $this->refreshInterval->defaultValue = '30';

        $this->refreshInterval->validate = function ($value, $setting) {

            if ($value < 15) {

                throw new \Exception('Value is invalid');

            }

        };


        $this->addSetting($this->refreshInterval);

    }

}
In this example you can see some of those properties. Here we create a setting named “refreshInterval” with the display name “Refresh Interval”. We want the setting value to be an integer and the user should enter this value in a text input field having the size 3. There is a description, an inline help and a default value of 30. The validate function makes sure to accept only integers that are at least 15, otherwise an error in the UI will be shown.
You do not always have to specify a PHP
typeand auiControlType. For instance if you specify a PHP type boolean we automatically display a checkbox by default. Similarly if you specify to display a checkbox we assume that you want a boolean value.Accessing settings values
You can access the value of a setting in a widget, in a controller, in a report or anywhere you want. To access the value create an instance of your settings class and get the value like this :
$settings = new Settings();

$interval = $settings->refreshInterval->getValue()
Type of settings
The Piwik platform differentiates between UserSetting and SystemSetting. User settings can be configured by any logged in user and each user can configure the setting independently. The Piwik platform makes sure that settings are stored per user and that a user cannot see another users configuration.
A system setting applies to all of your users. It can be configured only by a user who has super user access. By default, the value can be read only by a super user as well but often you want to have it readable by anyone or at least by logged in users. If you set a setting readable the value will still be only displayed to super users but you will always be able to access the value in the background.
Imagine you are building a widget that fetches data from a third party system where you need to configure an API URL and token. While no regular user should see the value of both settings, the value should still be readable by any logged in user. Otherwise when logged in users cannot read the setting value then the data cannot be fetched in the background when this user wants to see the content of the widget. Solve this by making the setting readable by the current user :
$setting->readableByCurrentUser = !Piwik::isUserIsAnonymous();Publishing your Plugin on the Marketplace
In case you want to share your settings or your plugin with other Piwik users you can do this by pushing your plugin to a public GitHub repository and creating a tag. Easy as that. Read more about how to distribute a plugin.
Advanced features
Isn’t it easy to create settings for plugins ? We never even created a file ! The Settings API already offers many possibilities but it might not yet be as flexible as your use case requires. So let us know in case you are missing something and we hope to add this feature at some point in the future.
If you have any feedback regarding our APIs or our guides in the Developer Zone feel free to send it to us. -
configure : Don’t add -fPIC on windows targets
5 juin 2013, par Martin Storsjöconfigure : Don’t add -fPIC on windows targets
This avoids warnings about this option not having any effect on
this platform.We still want to enable the pic configure item for these platforms
(if detected via the compiler builtin define __PIC__) to get proper
inline assembly workarounds.Signed-off-by : Martin Storsjö <martin@martin.st>