Recherche avancée
Autres articles (84)
-
Publier sur MédiaSpip
13 juin 2013Puis-je poster des contenus à partir d’une tablette Ipad ?
Oui, si votre Médiaspip installé est à la version 0.2 ou supérieure. Contacter au besoin l’administrateur de votre MédiaSpip pour le savoir -
Récupération d’informations sur le site maître à l’installation d’une instance
26 novembre 2010, parUtilité
Sur le site principal, une instance de mutualisation est définie par plusieurs choses : Les données dans la table spip_mutus ; Son logo ; Son auteur principal (id_admin dans la table spip_mutus correspondant à un id_auteur de la table spip_auteurs)qui sera le seul à pouvoir créer définitivement l’instance de mutualisation ;
Il peut donc être tout à fait judicieux de vouloir récupérer certaines de ces informations afin de compléter l’installation d’une instance pour, par exemple : récupérer le (...) -
Ajouter notes et légendes aux images
7 février 2011, parPour pouvoir ajouter notes et légendes aux images, la première étape est d’installer le plugin "Légendes".
Une fois le plugin activé, vous pouvez le configurer dans l’espace de configuration afin de modifier les droits de création / modification et de suppression des notes. Par défaut seuls les administrateurs du site peuvent ajouter des notes aux images.
Modification lors de l’ajout d’un média
Lors de l’ajout d’un média de type "image" un nouveau bouton apparait au dessus de la prévisualisation (...)
Sur d’autres sites (5642)
-
avformat/id3v2 : allow ID3 parsing without AVFormatContext
30 décembre 2013, par Anssi Hannulaavformat/id3v2 : allow ID3 parsing without AVFormatContext
Add ff_id3v2_read_dict() for parsing without AVFormatContext, but
instead with AVIOContext and AVDictionary.AVFormatContext is still used for logging, if available.
Chapter parsing is the only non-logging functionality that actually
needs AVFormatContext, and AFAICS it should be modified to write the
data to ID3v2ExtraMeta first, from where it can be implanted to
AVFormatContext by a separate function (like it is done with
read_apic() and ff_id3v2_parse_apic()). That is outside the scope of
this patch, though.Signed-off-by : Anssi Hannula <anssi.hannula@iki.fi>
-
hevc : Consider first quantization group any reference to 0, 0
11 janvier 2014, par Luca Barbato -
How to make your plugin configurable – Introducing the Piwik Platform
18 septembre 2014, par Thomas Steur — DevelopmentThis is the next post of our blog series where we introduce the capabilities of the Piwik platform (our previous post was How to add new pages and menu items to Piwik). This time you will learn how to define settings for your plugin. For this tutorial you will need to have basic knowledge of PHP.
What can I do with settings ?
The Settings API offers you a simple way to make your plugin configurable within the Admin interface of Piwik without having to deal with HTML, JavaScript, CSS or CSRF tokens. There are many things you can do with settings, for instance let users configure :
- connection infos to a third party system such as a WordPress installation.
- select a metric to be displayed in your widget
- select a refresh interval for your widget
- which menu items, reports or widgets should be displayed
- and much more
Getting started
In this series of posts, we assume that you have already set up your development environment. If not, visit the Piwik Developer Zone where you’ll find the tutorial Setting up Piwik.
To summarize the things you have to do to get setup :
- Install Piwik (for instance via git).
- Activate the developer mode :
./console development:enable --full. - Generate a plugin :
./console generate:plugin --name="MySettingsPlugin". There should now be a folderplugins/MySettingsPlugin. - And activate the created plugin under Settings => Plugins.
Let’s start creating settings
We start by using the Piwik Console to create a settings template :
./console generate:settingsThe command will ask you to enter the name of the plugin the settings should belong to. I will simply use the above chosen plugin name “MySettingsPlugin”. There should now be a file
plugins/MySettingsPlugin/Settings.phpwhich contains already some examples to get you started easily. To see the settings in action go to Settings => Plugin settings in your Piwik installation.
Adding one or more settings
Settings are added in the
init()method of the settings class by calling the methodaddSetting()and passing an instance of a UserSetting or SystemSetting object. How to create a setting is explained in the next chapter.Customising a setting
To create a setting you have to define a name along some options. For instance which input field should be displayed, what type of value you expect, a validator and more. Depending on the input field we might automatically validate the values for you. For example if you define available values for a select field then we make sure to validate and store only a valid value which provides good security out of the box.
For a list of possible properties have a look at the SystemSetting and UserSetting API reference.
class Settings extends \Piwik\Plugin\Settings
{
public $refreshInterval;
protected function init()
{
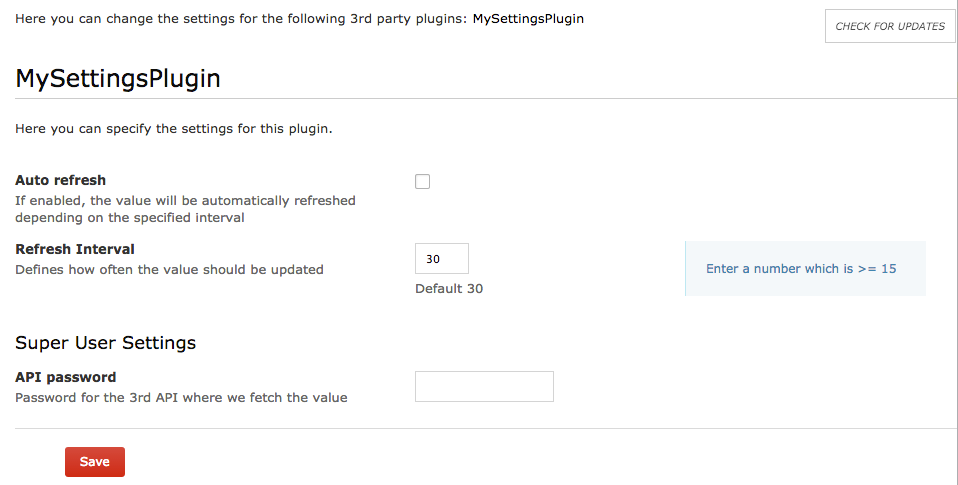
$this->setIntroduction('Here you can specify the settings for this plugin.');
$this->createRefreshIntervalSetting();
}
private function createRefreshIntervalSetting()
{
$this->refreshInterval = new UserSetting('refreshInterval', 'Refresh Interval');
$this->refreshInterval->type = static::TYPE_INT;
$this->refreshInterval->uiControlType = static::CONTROL_TEXT;
$this->refreshInterval->uiControlAttributes = array('size' => 3);
$this->refreshInterval->description = 'How often the value should be updated';
$this->refreshInterval->inlineHelp = 'Enter a number which is >= 15';
$this->refreshInterval->defaultValue = '30';
$this->refreshInterval->validate = function ($value, $setting) {
if ($value < 15) {
throw new \Exception('Value is invalid');
}
};
$this->addSetting($this->refreshInterval);
}
}In this example you can see some of those properties. Here we create a setting named “refreshInterval” with the display name “Refresh Interval”. We want the setting value to be an integer and the user should enter this value in a text input field having the size 3. There is a description, an inline help and a default value of 30. The validate function makes sure to accept only integers that are at least 15, otherwise an error in the UI will be shown.

You do not always have to specify a PHP
typeand auiControlType. For instance if you specify a PHP type boolean we automatically display a checkbox by default. Similarly if you specify to display a checkbox we assume that you want a boolean value.Accessing settings values
You can access the value of a setting in a widget, in a controller, in a report or anywhere you want. To access the value create an instance of your settings class and get the value like this :
$settings = new Settings();

$interval = $settings->refreshInterval->getValue()
Type of settings
The Piwik platform differentiates between UserSetting and SystemSetting. User settings can be configured by any logged in user and each user can configure the setting independently. The Piwik platform makes sure that settings are stored per user and that a user cannot see another users configuration.
A system setting applies to all of your users. It can be configured only by a user who has super user access. By default, the value can be read only by a super user as well but often you want to have it readable by anyone or at least by logged in users. If you set a setting readable the value will still be only displayed to super users but you will always be able to access the value in the background.
Imagine you are building a widget that fetches data from a third party system where you need to configure an API URL and token. While no regular user should see the value of both settings, the value should still be readable by any logged in user. Otherwise when logged in users cannot read the setting value then the data cannot be fetched in the background when this user wants to see the content of the widget. Solve this by making the setting readable by the current user :
$setting->readableByCurrentUser = !Piwik::isUserIsAnonymous();Publishing your Plugin on the Marketplace
In case you want to share your settings or your plugin with other Piwik users you can do this by pushing your plugin to a public GitHub repository and creating a tag. Easy as that. Read more about how to distribute a plugin.
Advanced features
Isn’t it easy to create settings for plugins ? We never even created a file ! The Settings API already offers many possibilities but it might not yet be as flexible as your use case requires. So let us know in case you are missing something and we hope to add this feature at some point in the future.
If you have any feedback regarding our APIs or our guides in the Developer Zone feel free to send it to us.