Recherche avancée
Médias (1)
-

The Great Big Beautiful Tomorrow
28 octobre 2011, par
Mis à jour : Octobre 2011
Langue : English
Type : Texte
Autres articles (33)
-
Gestion générale des documents
13 mai 2011, parMédiaSPIP ne modifie jamais le document original mis en ligne.
Pour chaque document mis en ligne il effectue deux opérations successives : la création d’une version supplémentaire qui peut être facilement consultée en ligne tout en laissant l’original téléchargeable dans le cas où le document original ne peut être lu dans un navigateur Internet ; la récupération des métadonnées du document original pour illustrer textuellement le fichier ;
Les tableaux ci-dessous expliquent ce que peut faire MédiaSPIP (...) -
Des sites réalisés avec MediaSPIP
2 mai 2011, parCette page présente quelques-uns des sites fonctionnant sous MediaSPIP.
Vous pouvez bien entendu ajouter le votre grâce au formulaire en bas de page. -
HTML5 audio and video support
13 avril 2011, parMediaSPIP uses HTML5 video and audio tags to play multimedia files, taking advantage of the latest W3C innovations supported by modern browsers.
The MediaSPIP player used has been created specifically for MediaSPIP and can be easily adapted to fit in with a specific theme.
For older browsers the Flowplayer flash fallback is used.
MediaSPIP allows for media playback on major mobile platforms with the above (...)
Sur d’autres sites (5482)
-
Using ffmpeg in Java
21 septembre 2014, par Riccardo BestettiI’m writing a Java program. I’m receiving a MPEG video stream via TCP and I have to decode it and re-encode it in a different format.
I have found JJMPEG, which are ffmpeg wrappers for Java, but they don’t get an update since 2 years ago. So I thought to implement my conversion by spawning a ffmpeg process from Java and piping the stream into it, and getting the data back from another pipe.
Would that be a optimal solution ? I need feedback from experienced people on both Java and ffmpeg programming.
-
Saying Goodbye To Old Machines
I recently sent a few old machines off for recycling. Both had relevance to the early days of the FATE testing effort. As is my custom, I photographed them (poorly, of course).
First, there’s the PowerPC-based Mac Mini I procured thanks to a Craigslist ad in late 2006. I had plans to develop automated FFmpeg building and testing and was already looking ahead toward testing multiple CPU architectures. Again, this was 2006 and PowerPC wasn’t completely on the outs yet– although Apple’s MacTel transition was in full swing, the entire new generation of video game consoles was based on PowerPC.

Click for larger image
I remember trying to find a Mac Mini PPC on Craigslist. Many were to be found, but all asked more than the price of even a new Mac Mini Intel, always because the seller was leaving all of last year’s applications and perhaps including a monitor, neither of which I needed. Fortunately, I found this bare Mac Mini. Also fortunate was the fact that it was far easier to install Linux on it than the first PowerPC machine I owned.
After FATE operation transitioned away from me, I still kept the machine in service as an edge server and automated backup machine. That is, until the hard drive failed on reboot one day. Thus, when it was finally time to recycle the computer, I felt it necessary to disassemble the machine and remove the hard drive for possible salvage and then for destruction.
If you’ve ever attempted to upgrade or otherwise service this style of Mac Mini, you will no doubt recognize the pictured paint scraper tool as standard kit. I have had that tool since I first endeavored to upgrade the RAM to 1 GB from the standard 1/2 GB. Performing such activities on a Mac Mini is tedious, but only if you care about putting it back together afterwards.
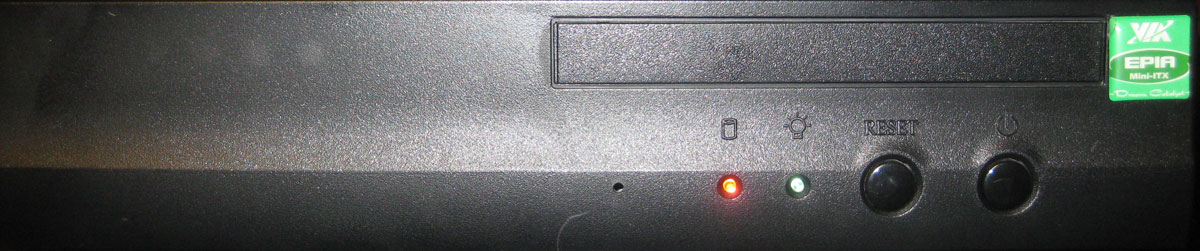
The next machine is a bit older. I put it together nearly a decade ago, early in 2005. This machine’s original duty was “download agent”– this would be more specifically called a BitTorrent machine in modern tech parlance. Back then, I placed it on someone else’s woefully underutilized home broadband connection (with their permission, of course) when I was too cheap to upgrade from dialup.

Click for larger image
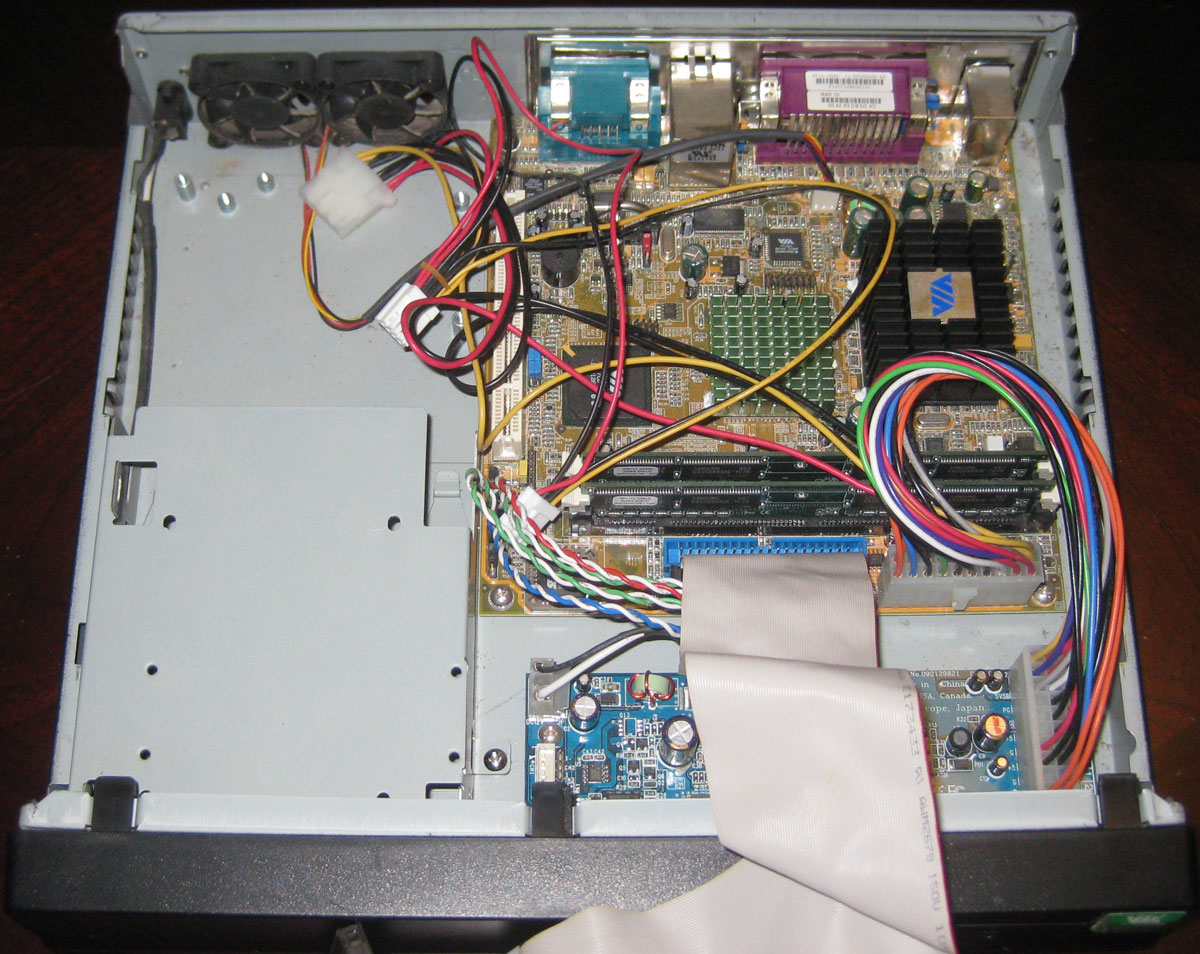
This is a small form factor system from VIA that was clearly designed with home theater PC (HTPC) use cases in mind. It has a VIA C3 x86-compatible CPU (according to my notes, Centaur VIA Samuel 2 stepping 03, flags : fpu de tsc msr cx8 mtrr pge mmx 3dnow) and 128 MB of RAM (initially ; I upgraded it to 512 MB some years later, just for the sake of doing it). And then there was the 120 GB PATA HD for all that downloaded goodness.

Click for larger image
I have specific memories of a time when my main computer at home wasn’t working correctly for one reason or another. Instead, I logged into this machine remotely via SSH to make several optimizations and fixes on FFmpeg’s VP3/Theora video decoder, all from the terminal, without being able to see the decoded images with my own eyes (which is why I insist that even blind people could work on video codecs).
By the time I got my own broadband, I had become inspired to attempt the automated build and test system for FFmpeg. This was the machine I used for prototyping early brainstorms of FATE. By the time I put a basic build/test system into place in early 2008, I had much faster computers that could build and test the project– obvious limitation of this machine is that it could take at least 1/2 hour to build the entire codebase, and that was the project from 8 years ago.
So the machine got stuffed in a closet somewhere along the line. The next time I pulled it out was in 2010 when I wanted to toy with Dreamcast programming once more (the machine appears in one of the photos in this post). This was the only machine I still owned which still had an RS-232 serial port (I didn’t know much about USB serial converters yet), plus it still had a bunch of pre-compiled DC homebrew binaries (I was having trouble getting the toolchain to work right).
The next time I dusted off this machine was late last year when I was trying some experiments with the Microsoft Xbox’s IDE drive (a photo in that post also shows the machine ; this thing shows up a lot on this blog). The VIA machine was the only machine I still owned which had 40-pin IDE connectors which was crucial to my experiment.
At this point, I was trying to make the machine more useful which meant replacing the ancient Gentoo Linux distribution as well as simply interacting with it via a keyboard and mouse. I have a long Evernote entry documenting a comedy of errors revolving around this little box. The interaction troubles were due to the fact that I didn’t have any PS/2 keyboards left and I couldn’t make a USB keyboard work with it. Diego was able to explain that I needed to flip a bit in the BIOS to address this which worked. As for upgrading the OS, I tried numerous Linux distributions large and small, mostly focusing on the small. None worked. I eventually learned that, while I was trying to use i686 distributions, this machine did not actually qualify as an i686 CPU ; installations usually booted but failed because the default kernel required the cmov instruction. I was advised to try i386 distros instead. My notes don’t indicate whether I had any luck on this front before I gave up and moved on.
I just made the connection that this VIA machine has two 40-pin IDE connectors which means that the thing was technically capable of supporting up to 4 IDE devices. Obviously, the computer couldn’t really accommodate that in terms of space or power. When I wanted to try installing a new OS, I needed take off the top and connect a rather bulky IDE CD-ROM drive. This computer’s casing was supposed to be able to support a slimline optical drive (perhaps like the type found in laptops), but I could never quite visualize how that was supposed to work, space-wise. When I disassembled the PowerPC Mac Mini, I realized I might be able to repurpose that machines optical drive for this computer. Obviously, I thought better of trying since both machines are off to the recycle pile.
I would still like to work on the Xbox project a bit more, but I procured a different, unused, much more powerful yet still old computer that has a motherboard with 1 PATA connector in addition to 6 SATA connectors. If I ever get around to toying with Linux kernel development, this should be a much more appropriate platform to use.
I thought about turning this machine into an old Windows XP (and lower, down to Windows 3.1) gaming platform ; the capabilities of the machine would probably be perfect for a huge portion of my Windows game collection. But I think the lack of an optical drive renders this idea intractable. External USB drives are likely out of the question since there is very little chance that this motherboard featured USB 2.0 (the specs don’t mention 2.0, so the USB ports are probably 1.1).
So it is with fond memories that I send off both machines, sans hard drives, to the recycle pile. I’m still deciding on an appropriate course of action for failed hard drives, though.
-
Dreamcast SD Adapter and DreamShell
31 décembre 2014, par Multimedia Mike — Sega DreamcastNope ! I’m never going to let go of the Sega Dreamcast hacking. When I was playing around with Dreamcast hacking early last year, I became aware that there is such a thing as an SD card adapter for the DC that plugs into the port normally reserved for the odd DC link cable. Of course I wanted to see what I could do with it.
The primary software that leverages the DC SD adapter is called DreamShell. Working with this adapter and the software requires some skill and guesswork. Searching for these topics tends to turn up results from various forums where people are trying to cargo-cult their way to solutions. I have a strange feeling that this post might become the unofficial English-language documentation on the matter.
Use Cases
What can you do with this thing ? Undoubtedly, the primary use is for backing up (ripping) the contents of GD-ROMs (the custom optical format used for the DC) and playing those backed up (ripped) copies. Presumably, users of this device leverage the latter use case more than the former, i.e., download ripped games, load them on the SD card, and launch them using DreamShell.However, there are other uses such as multimedia playback, system exploration, BIOS reprogramming, high-level programming, and probably a few other things I haven’t figured out yet.
Delivery
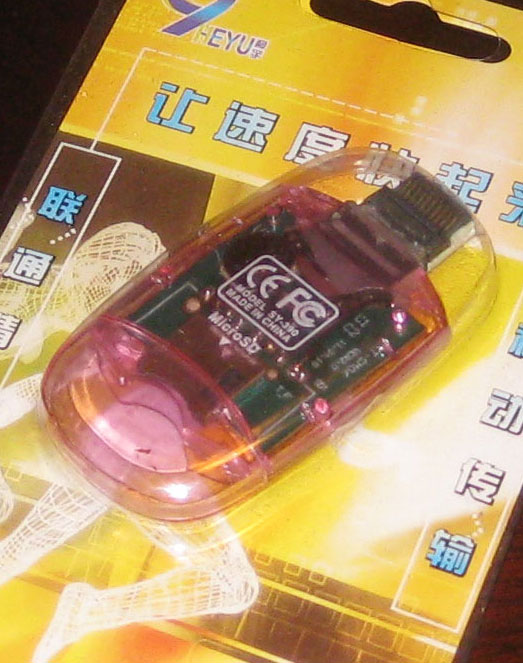
I put in an order via the dc-sd.com website and in about 2 short months, the item arrived from China. This marked my third lifetime delivery from China and curiously, all 3 of the shipments have pertained to the Sega Dreamcast.

Click for larger image
I thought it was very interesting that this adapter came in such complete packaging. The text is all in Chinese, though the back states “Windows 98 / ME / 2000 / XP, Mac OS 9.1, LINUX2.4”. That’s what tipped me off that they must have just cannibalized some old USB SD card readers and packaging in order to create these. Closer inspection of the internals through the translucent pink case confirms this.
Usage
According to its change log, DreamShell has been around for a long time with version 1.0.0 released in February of 2004. The current version is 4.0.0 RC3. There are several downloads available :- DreamShell 4.0 RC 3 CDI Image
- DreamShell 4.0 RC 3 + Boot Loader
- DreamShell 4.0 RC 3 + Core CDI image
Option #2 worked for me. It contains a CDI disc image and the DreamShell files in a directory named DS/.
Burn the CDI to a CD-R in the normal way you would burn a bootable Dreamcast disc from a CDI image. This is open-ended and left as an exercise to the reader, since there are many procedures depending on platform. On Linux, I used a small script I found once called burncdi-dc.sh.
Then, copy the contents of the DS/ folder to an SD card. As for filesystem, FAT16 and FAT32 are both known to work. The files in DS/ should land in the root of the SD card ; the folder DS/ should not be in the root.
Plug the SD card into the DC SD adapter and plug the adapter in the link cable port on the back of the Dreamcast. Then, boot the disc. If it works, you will see this minor corruption of the usual Sega licensing screen :

Then, there will be a brief white-on-black text screen that explains the booting process :

Then, there will be the main DreamShell logo :

Finally, you will land on the DreamShell main desktop :

Skepticism
At first, I was supremely skeptical of the idea that this SD adapter could perform speedily enough to play games reasonably. This was predicated on the observation that my DC coder’s cable that I used to use for homebrew development could not transfer faster than 115200 bits/second, amounting to about 11 kbytes/sec. I assumed that this was a fundamental limitation of the link port.In fact, I ripped a few of my Dreamcast discs over a decade ago and still have those rips lying around. So I copied the ISO image of Resident Evil : Code Veronica — the game I personally played most on the DC — to the SD card (anywhere works) and used the “ISO loader” icon seen on the desktop above to launch the game.
It works :

The opening FMV plays at full speed. Everything loads as fast as I remember. I was quite surprised.
Digression : My assumptions about serial speeds have often been mistaken. 10 years ago, I heard stories about how we would soon be able to watch streaming video on our cell phones. I scoffed because I thought the 56K limitation of dialup modems was some sort of fundamental speed-of-light type of limitation for telephony bandwidth, wired or wireless.
The desktop menu also includes a ‘speedtest’ tool that profiles the write and read performance of your preferred storage medium. For my fastest SD card (a PNY 2 GB card) :

This is probably more representative of the true adapter bandwidth as reading and writing is a good deal faster through more modern interfaces on PC and Mac with this same card.
Look at the other options on the speedtest console. Hard drive ? Apparently, it’s possible, but it requires a good deal more hardware hacking than just purchasing this SD adapter.
Ripping
As you can see from the Resident Evil screenshot, playing games works quite nicely. How about ripping ? I’m pleased to say that DreamShell has a beautiful ripping interface :

Enter a name for the disc (or read the disc label), select the storage medium, and let it, well, rip. It indicates which track it’s working on and the Sega logo acts as a progress bar, shading blue as the track rip progresses.
I’m finally, efficiently, archiving that collection of Sega Dreamcast demo discs ; I’m hoping they’ll eventually find a home at the Internet Archive. How is overall ripping performance ? Usually about 38-40 minutes to rip a full 900-1000 MB. That certainly beats the 27-28 hours that were required when I performed the ripping at 11 kbytes/sec via the DC coders cable.
All is well until I get a sector reading error :

That’s when it can come in handy to have 3 DC consoles (see ?! not crazy !).
Other Uses
There’s a file explorer. You can browse the filesystem of the SD card, visual memory unit, or the CD portion of the GD-ROM (would be more useful if it accessed the GD area). There are FFmpeg files included. So I threw a random Cinepak file and random MPEG-1 file at it to see what happens. MPEG-1 didn’t do anything, but this Cinepak file from some Sierra game played handily :

If you must enter strings, it helps to have a Dreamcast keyboard (which I do). Failing that, here’s a glimpse of the onscreen keyboard that DreamShell equips :

Learning to use it is a game in itself.
There is an option of installing DreamShell in the BIOS. I did not attempt this. I don’t know if it’s possible (not like there’s a lot of documentation)– perhaps a custom BIOS modchip is needed. But here’s what the screen looks like :

There is also a plain console to interact with (better have a physical keyboard). There are numerous file manipulation commands and custom system interaction commands. I see one interesting command called ‘addr’ that looks useful for dumping memory regions to a file.
A Lua language interpreter is also built in. I would love to play with this if I could ascertain whether DreamShell provided Dreamcast-specific APIs.
Tips And Troubleshooting
I have 3 Dreamcast consoles, affectionately named Terran, Protoss, and Zerg after the StarCraft II stickers with which they are adorned. Some seem to work better than others. Protoss seemed to be able to boot the DreamShell disc more reliably than the others. However, I was alarmed when it couldn’t boot one morning when it was churning the previous day.I think the problem is that it was just cold. That seemed to be the issue. I put in a normal GD-ROM and let it warm up on that disc for awhile and then DreamShell booted fine. So that’s my piece of cargo-culting troubleshooting advice.