Recherche avancée
Médias (91)
-

GetID3 - Boutons supplémentaires
9 avril 2013, par
Mis à jour : Avril 2013
Langue : français
Type : Image
-

Core Media Video
4 avril 2013, par
Mis à jour : Juin 2013
Langue : français
Type : Video
-

The pirate bay depuis la Belgique
1er avril 2013, par
Mis à jour : Avril 2013
Langue : français
Type : Image
-

Bug de détection d’ogg
22 mars 2013, par
Mis à jour : Avril 2013
Langue : français
Type : Video
-

Exemple de boutons d’action pour une collection collaborative
27 février 2013, par
Mis à jour : Mars 2013
Langue : français
Type : Image
-

Exemple de boutons d’action pour une collection personnelle
27 février 2013, par
Mis à jour : Février 2013
Langue : English
Type : Image
Autres articles (48)
-
Participer à sa traduction
10 avril 2011Vous pouvez nous aider à améliorer les locutions utilisées dans le logiciel ou à traduire celui-ci dans n’importe qu’elle nouvelle langue permettant sa diffusion à de nouvelles communautés linguistiques.
Pour ce faire, on utilise l’interface de traduction de SPIP où l’ensemble des modules de langue de MediaSPIP sont à disposition. ll vous suffit de vous inscrire sur la liste de discussion des traducteurs pour demander plus d’informations.
Actuellement MediaSPIP n’est disponible qu’en français et (...) -
La file d’attente de SPIPmotion
28 novembre 2010, parUne file d’attente stockée dans la base de donnée
Lors de son installation, SPIPmotion crée une nouvelle table dans la base de donnée intitulée spip_spipmotion_attentes.
Cette nouvelle table est constituée des champs suivants : id_spipmotion_attente, l’identifiant numérique unique de la tâche à traiter ; id_document, l’identifiant numérique du document original à encoder ; id_objet l’identifiant unique de l’objet auquel le document encodé devra être attaché automatiquement ; objet, le type d’objet auquel (...) -
Pas question de marché, de cloud etc...
10 avril 2011Le vocabulaire utilisé sur ce site essaie d’éviter toute référence à la mode qui fleurit allègrement
sur le web 2.0 et dans les entreprises qui en vivent.
Vous êtes donc invité à bannir l’utilisation des termes "Brand", "Cloud", "Marché" etc...
Notre motivation est avant tout de créer un outil simple, accessible à pour tout le monde, favorisant
le partage de créations sur Internet et permettant aux auteurs de garder une autonomie optimale.
Aucun "contrat Gold ou Premium" n’est donc prévu, aucun (...)
Sur d’autres sites (5898)
-
[Aug-Sept 2013] Piwik 2.0 Development Update !
3 octobre 2013, par Fabian Becker — DevelopmentThis Development Update is the first in a new series of posts we’ll be writing to keep you, our loyal users, informed of our efforts. We hope these updates keep you excited about Piwik’s future, and if you’re a developer, we hope they inspire and challenge you to accomplish more yourself !
Despite this being our first update, it will probably be one of our biggest. We’ve gotten a lot done as we race towards the Piwik 2.0 release ! Just see for yourself :
What we’ve accomplished
Theming
Piwik now supports theming, a feature that was requested often in the past. Because of our switch to the Twig template engine and other major code changes it is now possible to change the way Piwik looks. Additionally, developers can use the dynamic stylesheet language LESS, instead of CSS. Piwik will automatically transform the LESS code into CSS.
Piwik 2.0 will ship with a new dark theme called PleineLune (french for Full Moon) that makes use of the new theming feature. Another theme with a left-aligned menu was created during the Piwik Meetup in Paris. Both of these themes were created by Thomas Zilliox, a very talented designer and CSS expert.


PHP 5.3 Namespaces
For Piwik 2.0 we decided to make use of namespaces, a feature introduced in PHP 5.3. The usage of namespaces makes our code more readable and allows us to better modularize the platform. This is in part why we are raising the required minimum PHP version to 5.3 for Piwik 2.0. (Remember to update your server !)
Translations in JSON
All translations are now stored in JSON files which makes storing translations in Piwik a lot cleaner that the giant PHP array we previously used.
Side note : if you’d like to make Piwik available to more languages, please sign up at translations.piwik.org. We’d love to have your help !
UI Tests
We now use UI tests to make sure that changes to the code don’t break the UI. UI tests use PhantomJS and CutyCapt and are automatically executed on Travis CI. Whenever an integration test fails the script produces a screenshot diff that shows the difference. Learn more.

AnonymizeIP supports IPv6
The AnonymizeIP plugin now masks IPv6 addresses. The concept of the config option ‘ip_address_mask_length’ has now changed to reflect the level of masking that should be applied to the IP. With a masking level of 1 Piwik will mask the last octet of an IPv4 address and the last 80 bits of an IPv6 address.
All Websites Dashboard usable with 20,000+ Websites
The All Websites Dashboard is now usable even if you track many thousands of websites in your Piwik instance. We rewrote parts of the archiving process in order to make this possible. Making Piwik fast and memory efficient is a constant concern for core developers.
Plugins can now add new Visualizations
Piwik Plugins and Themes can now create new visualizations for your report data. They can also specify their own ViewDataTable footer icons or modify existing ones. This will allow plugin developers to create new ways for you to view your data, customize existing reports so they look great in new visualizations and provide extra analytics functionality accessible in each of your reports.
The new TreemapVisualization plugin makes use of this feature to let you view your reports as treemaps. It serves as an example of this new functionality.
Piwik Marketplace
The Piwik Marketplace is a new platform developers can use to publish their plugins and themes so all Piwik users can easily access them. The marketplace is hosted at plugins.piwik.org and is currently in an early development state, but we’re already able to host plugins !
Developers can easily publish their plugins by adding a commit hook to their Github repositories. Every time you push a new tag, the marketplace will make a new version of your plugin available. The marketplace will provide a centralized platform to search for plugins and also provide statistics on plugin usage.
Install Plugins and Themes in one click from within Piwik
Piwik has offered since the beginning the much-loved “one click update” feature. We are bringing the same functionnality to the Marketplace : you will be able to install Plugins and Themes in one click directly within the Piwik interface ! Similarly to WordPress or Firefox, Piwik will let you extend the functionnality of your analytics platform.
Conclusion
In Piwik 2.0 you will be able to install plugins and themes from the marketplace. And, if you’re so inclined, you will be able to create and host your own plugins/themes on the marketplace so everyone can use them. This is by far the accomplishment we are most excited by… the possibilities it opens up for Piwik’s future are truly unlimited. We hope you share our excitement !
Au revoir, until next time !
PS : our mission is to liberate web analytics ; thank you for sharing the word about Piwik 2.0 !
-
Adventures In NAS
1er janvier, par Multimedia Mike — GeneralIn my post last year about my out-of-control single-board computer (SBC) collection which included my meager network attached storage (NAS) solution, I noted that :
I find that a lot of my fellow nerds massively overengineer their homelab NAS setups. I’ll explore this in a future post. For my part, people tend to find my homelab NAS solution slightly underengineered.
So here I am, exploring this is a future post. I’ve been in the home NAS game a long time, but have never had very elaborate solutions for such. For my part, I tend to take an obsessively reductionist view of what constitutes a NAS : Any small computer with a pool of storage and a network connection, running the Linux operating system and the Samba file sharing service.

Many home users prefer to buy turnkey boxes, usually that allow you to install hard drives yourself, and then configure the box and its services with a friendly UI. My fellow weird computer nerds often buy cast-off enterprise hardware and set up more resilient, over-engineered solutions, as long as they have strategies to mitigate the noise and dissipate the heat, and don’t mind the electricity bills.
If it works, awesome ! As an old hand at this, I am rather stuck in my ways, however, preferring to do my own stunts, both with the hardware and software solutions.
My History With Home NAS Setups
In 1998, I bought myself a new computer — beige box tower PC, as was the style as the time. This was when normal people only had one computer at most. It ran Windows, but I was curious about this new thing called “Linux” and learned to dual boot that. Later that year, it dawned on me that nothing prevented me from buying a second ugly beige box PC and running Linux exclusively on it. Further, it could be a headless Linux box, connected by ethernet, and I could consolidate files into a single place using this file sharing software named Samba.
I remember it being fairly onerous to get Samba working in those days. And the internet was not quite so helpful in those days. I recall that the thing that blocked me for awhile was needing to know that I had to specify an entry for the Samba server machine in the LMHOSTS (Lanman hosts) file on the Windows 95 machine.
However, after I cracked that code, I have pretty much always had some kind of ad-hoc home NAS setup, often combined with a headless Linux development box.
In the early 2000s, I built a new beige box PC for a file server, with a new hard disk, and a coworker tutored me on setting up a (P)ATA UDMA 133 (or was it 150 ? anyway, it was (P)ATA’s last hurrah before SATA conquered all) expansion card and I remember profiling that the attached hard drive worked at a full 21 MBytes/s reading. It was pretty slick. Except I hadn’t really thought things through. You see, I had a hand-me-down ethernet hub cast-off from my job at the time which I wanted to use. It was a 100 Mbps repeater hub, not a switch, so the catch was that all connected machines had to be capable of 100 Mbps. So, after getting all of my machines (3 at the time) upgraded to support 10/100 ethernet (the old off-brand PowerPC running Linux was the biggest challenge), I profiled transfers and realized that the best this repeater hub could achieve was about 3.6 MBytes/s. For a long time after that, I just assumed that was the upper limit of what a 100 Mbps network could achieve. Obviously, I now know that the upper limit ought to be around 11.2 MBytes/s and if I had gamed out that fact in advance, I would have realized it didn’t make sense to care about super-fast (for the time) disk performance.
At this time, I was doing a lot for development for MPlayer/xine/FFmpeg. I stored all of my multimedia material on this NAS. I remember being confused when I was working with Y4M data, which is raw frames, which is lots of data. xine, which employed a pre-buffering strategy, would play fine for a few seconds and then stutter. Eventually, I reasoned out that the files I was working with had a data rate about twice what my awful repeater hub supported, which is probably the first time I came to really understand and respect streaming speeds and their implications for multimedia playback.
Smaller Solutions
For a period, I didn’t have a NAS. Then I got an Apple AirPort Extreme, which I noticed had a USB port. So I bought a dual drive brick to plug into it and used that for a time. Later (2009), I had this thing called the MSI Wind Nettop which is the only PC I’ve ever seen that can use a CompactFlash (CF) card for a boot drive. So I did just that, and installed a large drive so it could function as a NAS, as well as a headless dev box. I’m still amazed at what a low-power I/O beast this thing is, at least when compared to all the ARM SoCs I have tried in the intervening 1.5 decades. I’ve had spinning hard drives in this thing that could read at 160 MBytes/s (‘dd’ method) and have no trouble saturating the gigabit link at 112 MBytes/s, all with its early Intel Atom CPU.Around 2015, I wanted a more capable headless dev box and discovered Intel’s line of NUCs. I got one of the fat models that can hold a conventional 2.5″ spinning drive in addition to the M.2 SATA SSD and I was off and running. That served me fine for a few years, until I got into the ARM SBC scene. One major limitation here is that 2.5″ drives aren’t available in nearly the capacities that make a NAS solution attractive.
Current Solution
My current NAS solution, chronicled in my last SBC post– the ODroid-HC2, which is a highly compact ARM SoC with an integrated USB3-SATA bridge so that a SATA drive can be connected directly to it :

ODROID-HC2 NAS
I tend to be weirdly proficient at recalling dates, so I’m surprised that I can’t recall when I ordered this and put it into service. But I’m pretty sure it was circa 2018. It’s only equipped with an 8 TB drive now, but I seem to recall that it started out with only a 4 TB drive. I think I upgraded to the 8 TB drive early in the pandemic in 2020, when ISPs were implementing temporary data cap amnesty and I was doing what a r/DataHoarder does.
The HC2 has served me well, even though it has a number of shortcomings for a hardware set chartered for NAS :
- While it has a gigabit ethernet port, it’s documented that it never really exceeds about 70 MBytes/s, due to the SoC’s limitations
- The specific ARM chip (Samsung Exynos 5422 ; more than a decade old as of this writing) lacks cryptography instructions, slowing down encryption if that’s your thing (e.g., LUKS)
- While the SoC supports USB3, that block is tied up for the SATA interface ; the remaining USB port is only capable of USB2 speeds
- 32-bit ARM, which prevented me from running certain bits of software I wanted to try (like Minio)
- Only 1 drive, so no possibility for RAID (again, if that’s your thing)
I also love to brag on the HC2’s power usage : I once profiled the unit for a month using a Kill-A-Watt and under normal usage (with the drive spinning only when in active use). The unit consumed 4.5 kWh… in an entire month.
New Solution
Enter the ODroid-HC4 (I purchased mine from Ameridroid but Hardkernel works with numerous distributors) :

ODroid-HC4 with an SSD and a conventional drive
I ordered this earlier in the year and after many months of procrastinating and obsessing over the best approach to take with its general usage, I finally have it in service as my new NAS. Comparing point by point with the HC2 :
- The gigabit ethernet runs at full speed (though a few things on my network run at 2.5 GbE now, so I guess I’ll always be behind)
- The ARM chip (Amlogic S905X3) has AES cryptography acceleration and handles all the LUKS stuff without breaking a sweat ; “cryptsetup benchmark” reports between 500-600 MBytes/s on all the AES variants
- The USB port is still only USB2, so no improvement there
- 64-bit ARM, which means I can run Minio to simulate block storage in a local dev environment for some larger projects I would like to undertake
- Supports 2 drives, if RAID is your thing
How I Set It Up
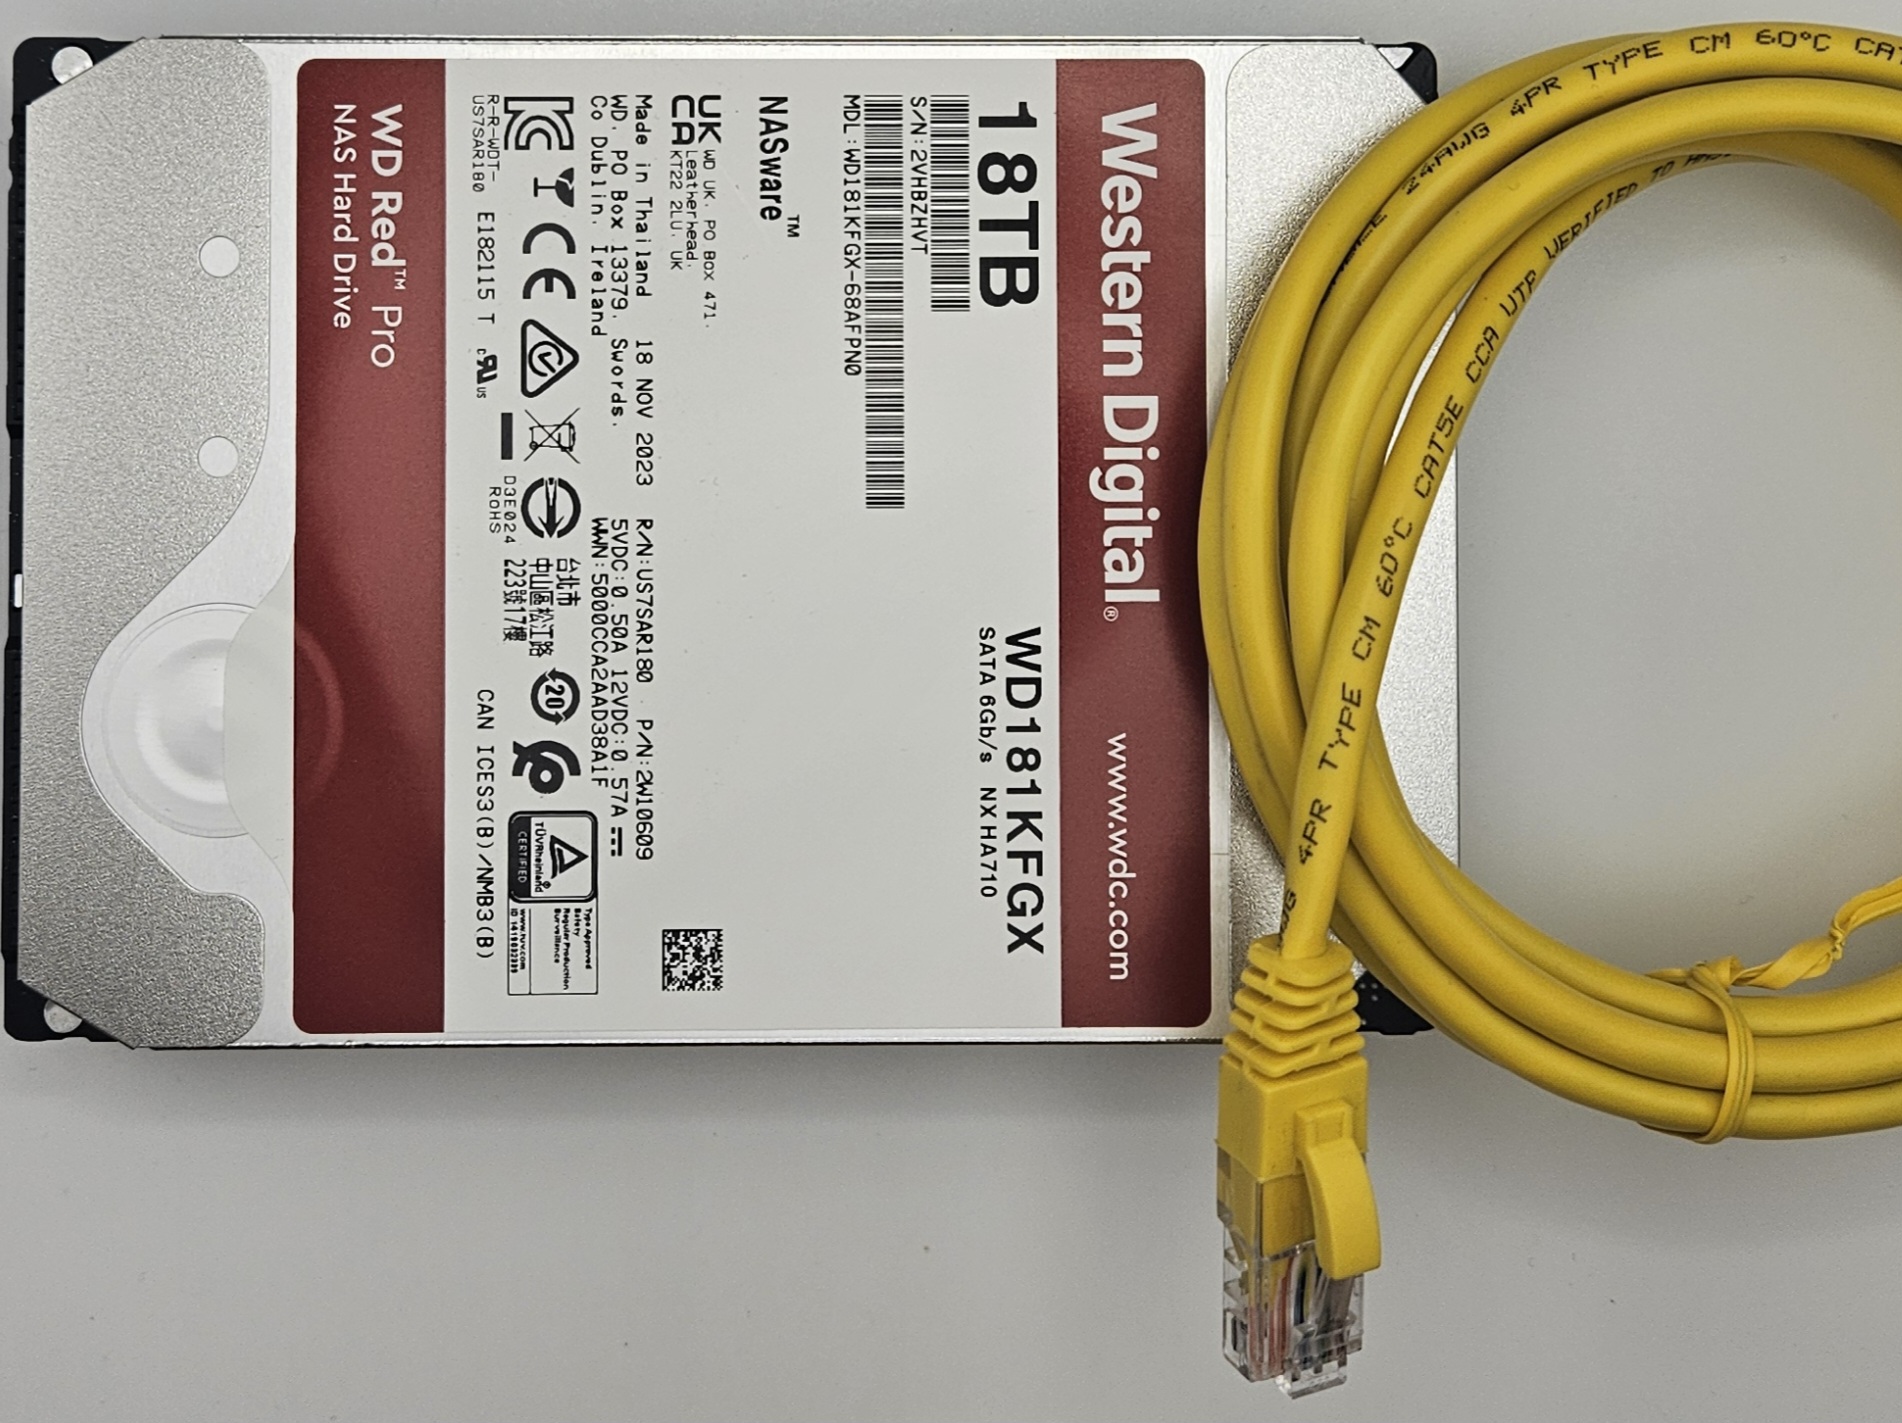
How to set up the drive configuration ? As should be apparent from the photo above, I elected for an SSD (500 GB) for speed, paired with a conventional spinning HDD (18 TB) for sheer capacity. I’m not particularly trusting of RAID. I’ve watched it fail too many times, on systems that I don’t even manage, not to mention that aforementioned RAID brick that I had attached to the Apple AirPort Extreme.I had long been planning to use bcache, the block caching interface for Linux, which can use the SSD as a speedy cache in front of the more capacious disk. There is also LVM cache, which is supposed to achieve something similar. And then I had to evaluate the trade-offs in whether I wanted write-back, write-through, or write-around configurations.
This was all predicated on the assumption that the spinning drive would not be able to saturate the gigabit connection. When I got around to setting up the hardware and trying some basic tests, I found that the conventional HDD had no trouble keeping up with the gigabit data rate, both reading and writing, somewhat obviating the need for SSD acceleration using any elaborate caching mechanisms.
Maybe that’s because I sprung for the WD Red Pro series this time, rather than the Red Plus ? I’m guessing that conventional drives do deteriorate over the years. I’ll find out.
For the operating system, I stuck with my newest favorite Linux distro : DietPi. While HardKernel (parent of ODroid) makes images for the HC units, I had also used DietPi for the HC2 for the past few years, as it tends to stay more up to date.
Then I rsync’d my data from HC2 -> HC4. It was only about 6.5 TB of total data but it took days as this WD Red Plus drive is only capable of reading at around 10 MBytes/s these days. Painful.
For file sharing, I’m pretty sure most normal folks have nice web UIs in their NAS boxes which allow them to easily configure and monitor the shares. I know there are such applications I could set up. But I’ve been doing this so long, I just do a bare bones setup through the terminal. I installed regular Samba and then brought over my smb.conf file from the HC2. 1 by 1, I tested that each of the old shares were activated on the new NAS and deactivated on the old NAS. I also set up a new share for the SSD. I guess that will just serve as a fast I/O scratch space on the NAS.
The conventional drive spins up and down. That’s annoying when I’m actively working on something but manage not to hit the drive for like 5 minutes and then an application blocks while the drive wakes up. I suppose I could set it up so that it is always running. However, I micro-manage this with a custom bash script I wrote a long time ago which logs into the NAS and runs the “date” command every 2 minutes, appending the output to a file. As a bonus, it also prints data rate up/down stats every 5 seconds. The spinning file (“nas-main/zz-keep-spinning/keep-spinning.txt”) has never been cleared and has nearly a quarter million lines. I suppose that implies that it has kept the drive spinning for 1/2 million minutes which works out to around 347 total days. I should compare that against the drive’s SMART stats, if I can remember how. The earliest timestamp in the file is from March 2018, so I know the HC2 NAS has been in service at least that long.
For tasks, vintage cron still does everything I could need. In this case, that means reaching out to websites (like this one) and automatically backing up static files.
I also have to have a special script for starting up. Fortunately, I was able to bring this over from the HC2 and tweak it. The data disks (though not boot disk) are encrypted. Those need to be unlocked and only then is it safe for the Samba and Minio services to start up. So one script does all that heavy lifting in the rare case of a reboot (this is the type of system that’s well worth having on a reliable UPS).
Further Work
I need to figure out how to use the OLED display on the NAS, and how to make it show something more useful than the current time and date, which is what it does in its default configuration with HardKernel’s own Linux distro. With DietPi, it does nothing by default. I’m thinking it should be able to show the percent usage of each of the 2 drives, at a minimum.I also need to establish a more responsible backup regimen. I’m way too lazy about this. Fortunately, I reason that I can keep the original HC2 in service, repurposed to accept backups from the main NAS. Again, I’m sort of micro-managing this since a huge amount of data isn’t worth backing up (remember the whole DataHoarder bit), but the most important stuff will be shipped off.
The post Adventures In NAS first appeared on Breaking Eggs And Making Omelettes.
-
Get the maximum frequency of an audio spectrum
6 avril, par milahuI want to detect the cutoff frequency of the AAC audio encoder used to compress an M4A audio file.


This cutoff frequency (or maximum frequency) is an indicator of audio quality.
High-quality audio has a cutoff around 20KHz (fullband),
medium-quality audio has a cutoff around 14KHz (superwideband),
low-quality audio has a cutoff around 7KHz (wideband),
super-low-quality audio has a cutoff around 3KHz (narrowband).
See also : voice frequency


Example spectrum of a 2 hours movie, generated with
sox, with a maximum frequency around 19.6KHz :


The program should ignore noise below a certain loudness, for example -80dB.


Here is a Python script generated by deepseek.com but it returns 0.2KHz instead of 19.6KHz.


#!/usr/bin/env python3

# get the maximum frequency
# of an audio spectrum
# as an indicator
# of the actual audio quality

# generated by deepseek.com

# prompt
"""
create a python script
to detect the maximum frequency 
in an m4a audio file.
that maximum frequency is produced
by the lowpass filter
of the aac audio encoder.
high-quality audio
has a maximum frequency
around 20 KHz (fullband),
low-quality audio
has a maximum frequency
around 3 KHz (narrowband).
use ffmpeg to decode the audio
to pcm
in chunks of 10 seconds.
for each chunk:
detect the local maximum,
print the local maximum
and the chunk time
with the format
f"t={t}sec f={f}KHz",
update the global maximum.
to detect the local maximum,
remove the noise floor
around -110dB,
then find the maximum frequency
in the spectrum.
accept some command line options:
--ss n:
pass as "-ss n" to ffmpeg.
--to n:
pass as "-to n" to ffmpeg.
both -ss and -to args
must come before the -i arg
for ffmpeg input seeking.
print all frequencies in KHz.
add a shebang line before the script,
spaced by an empty line.
do not recode the audio with ffmpeg.
use ffprobe to get the input samplerate,
usually 48KHz or 44.1KHz.
create a python class,
so we dont have to pass all parameters to functions.
add a command line option to select the audio track id, by default zero.
"""

#!/usr/bin/env python3

import argparse
import numpy as np
import subprocess
import sys
from tempfile import NamedTemporaryFile


class AudioAnalyzer:
 def __init__(self, input_file, audio_track=0, start_time=None, end_time=None):
 self.input_file = input_file
 self.audio_track = audio_track
 self.start_time = start_time
 self.end_time = end_time
 self.sample_rate = self._get_sample_rate()
 self.global_max_freq = 0
 self.global_max_time = 0

 def _get_sample_rate(self):
 cmd = [
 'ffprobe',
 '-v', 'error',
 '-select_streams', f'a:{self.audio_track}',
 '-show_entries', 'stream=sample_rate',
 '-of', 'default=noprint_wrappers=1:nokey=1',
 self.input_file
 ]
 result = subprocess.run(cmd, capture_output=True, text=True)
 return float(result.stdout.strip())

 def _get_ffmpeg_command(self):
 cmd = [
 'ffmpeg',
 '-hide_banner',
 '-loglevel', 'error',
 ]
 
 if self.start_time is not None:
 cmd.extend(['-ss', str(self.start_time)])
 if self.end_time is not None:
 cmd.extend(['-to', str(self.end_time)])
 
 cmd.extend([
 '-i', self.input_file,
 '-map', f'0:a:{self.audio_track}',
 '-ac', '1', # convert to mono
 '-f', 'f32le', # 32-bit float PCM
 '-'
 ])
 
 return cmd

 def analyze(self, chunk_size=10):
 ffmpeg_cmd = self._get_ffmpeg_command()
 
 with subprocess.Popen(ffmpeg_cmd, stdout=subprocess.PIPE) as process:
 chunk_samples = int(chunk_size * self.sample_rate)
 bytes_per_sample = 4 # 32-bit float
 chunk_bytes = chunk_samples * bytes_per_sample
 
 current_time = self.start_time if self.start_time is not None else 0
 
 while True:
 raw_data = process.stdout.read(chunk_bytes)
 if not raw_data:
 break
 
 samples = np.frombuffer(raw_data, dtype=np.float32)
 if len(samples) == 0:
 continue
 
 local_max_freq = self._analyze_chunk(samples)
 
 print(f"t={current_time:.1f}sec f={local_max_freq:.1f}KHz")
 
 if local_max_freq > self.global_max_freq:
 self.global_max_freq = local_max_freq
 self.global_max_time = current_time
 
 current_time += chunk_size

 def _analyze_chunk(self, samples):
 # Apply Hanning window
 window = np.hanning(len(samples))
 windowed_samples = samples * window
 
 # Compute FFT
 fft = np.fft.rfft(windowed_samples)
 magnitudes = np.abs(fft)
 
 # Convert to dB
 eps = 1e-10 # avoid log(0)
 magnitudes_db = 20 * np.log10(magnitudes + eps)
 
 # Frequency bins
 freqs = np.fft.rfftfreq(len(samples), 1.0 / self.sample_rate) / 1000 # in KHz
 
 # Remove noise floor (-110dB)
 threshold = -110
 valid_indices = magnitudes_db > threshold
 valid_freqs = freqs[valid_indices]
 valid_magnitudes = magnitudes_db[valid_indices]
 
 if len(valid_freqs) == 0:
 return 0
 
 # Find frequency with maximum magnitude
 max_idx = np.argmax(valid_magnitudes)
 max_freq = valid_freqs[max_idx]
 
 return max_freq


def main():
 parser = argparse.ArgumentParser(description='Detect maximum frequency in audio file')
 parser.add_argument('input_file', help='Input audio file (m4a)')
 parser.add_argument('--ss', type=float, help='Start time in seconds')
 parser.add_argument('--to', type=float, help='End time in seconds')
 parser.add_argument('--track', type=int, default=0, help='Audio track ID (default: 0)')
 args = parser.parse_args()

 analyzer = AudioAnalyzer(
 input_file=args.input_file,
 audio_track=args.track,
 start_time=args.ss,
 end_time=args.to
 )
 
 print(f"Analyzing audio file: {args.input_file}")
 print(f"Sample rate: {analyzer.sample_rate/1000:.1f} KHz")
 print(f"Audio track: {args.track}")
 if args.ss is not None:
 print(f"Start time: {args.ss} sec")
 if args.to is not None:
 print(f"End time: {args.to} sec")
 print("---")
 
 analyzer.analyze()
 
 print("---")
 print(f"Global maximum: t={analyzer.global_max_time:.1f}sec f={analyzer.global_max_freq:.1f}KHz")
 
 if analyzer.global_max_freq > 15:
 print("Quality: Fullband (high quality)")
 elif analyzer.global_max_freq > 5:
 print("Quality: Wideband (medium quality)")
 else:
 print("Quality: Narrowband (low quality)")


if __name__ == '__main__':
 main()


Similar question :
How to find the max frequency at a certain db in a fft signal


edited by kesh


Here is an example psd indicating the fullband quality with a psd dropoff around 20 kHz.