Recherche avancée
Autres articles (94)
-
Qu’est ce qu’un éditorial
21 juin 2013, parEcrivez votre de point de vue dans un article. Celui-ci sera rangé dans une rubrique prévue à cet effet.
Un éditorial est un article de type texte uniquement. Il a pour objectif de ranger les points de vue dans une rubrique dédiée. Un seul éditorial est placé à la une en page d’accueil. Pour consulter les précédents, consultez la rubrique dédiée.
Vous pouvez personnaliser le formulaire de création d’un éditorial.
Formulaire de création d’un éditorial Dans le cas d’un document de type éditorial, les (...) -
Contribute to translation
13 avril 2011You can help us to improve the language used in the software interface to make MediaSPIP more accessible and user-friendly. You can also translate the interface into any language that allows it to spread to new linguistic communities.
To do this, we use the translation interface of SPIP where the all the language modules of MediaSPIP are available. Just subscribe to the mailing list and request further informantion on translation.
MediaSPIP is currently available in French and English (...) -
Des sites réalisés avec MediaSPIP
2 mai 2011, parCette page présente quelques-uns des sites fonctionnant sous MediaSPIP.
Vous pouvez bien entendu ajouter le votre grâce au formulaire en bas de page.
Sur d’autres sites (7424)
-
How to create a custom theme in Piwik – Introducing the Piwik Platform
23 août 2014, par Thomas Steur — DevelopmentThis is the start of a new blog series where we introduce the capabilities of the Piwik platform. You’ll learn how to write custom plugins & themes, how to use our HTTP APIs and more.
We have been greatly simplifying our APIs over the last year focusing primarily on one design principle :
The complexity of our API should never exceed the complexity of your use case.
In other words, if you have a simple use for our API, we want it to be simple for you to accomplish it. If you have a complex, big, hairy, change-the-world idea, then maybe we can’t make it simple for you to accomplish it, but we want it to be possible.
Over the next weeks and months you will learn what exactly we mean by this and how we accomplished it.
FYI, don’t worry if you’re currently using our APIs, we keep them backwards compatible and we announce breaking changes in our platform changelog.
Getting started
In this series of posts, we assume that you have already set up your development environment. If not, visit the Piwik Developer Zone where you’ll find the tutorial Setting up Piwik.
To summarize the things you have to do to get setup :
- Install Piwik (for instance via git).
- Activate the developer mode :
./console development:enable --full. - And if you want, generate some test data :
./console visitorgenerator:generate-visits --idsite=1 --limit-fake-visits=600. This can take a while and requires the VisitorGenerator plugin from the Marketplace.
Let’s start creating our own theme
We start by using the Piwik Console to create a blank theme :
./console generate:themeThe command will ask you to enter a name, description and version number for your theme. I will simply use “CustomTheme” as the name of the theme. There should now be a folder
plugins/CustomThemewhich contains some files to get you started easily.Before we modify our theme, we have to activate it by visiting the Settings => Themes admin page in our Piwik installation, or alternatively by running the command
./console core:plugin activate YourCustomTheme. If the theme is not activated, we won’t see any changes.Theme Contents
The most important files in our theme are
plugins/CustomTheme/stylesheets/theme.less,plugins/CustomTheme/stylesheets/_colors.lessandplugins/CustomTheme/stylesheets/_variables.less:theme.lessis the file that will be included when your theme is activated. In this file you would include other stylesheet files and overwrite CSS styles._colors.lesscontains many less variables allowing you to easily change the colors Piwik uses._variables.lesscontains currently only one variable to change the font family. More variables will be added in the future. Note : This is a new feature and the file will be only there in case you have installed Piwik using Git or at least Piwik 2.6.0.
Changing the font family
To change the font family simply overwrite the variable
@theme-fontFamily-base: Verdana, sans-serif;in_variables.less. That’s it.Changing colors
To change a color, uncomment the less variables of the colors you want to change in
_colors.less. I will shortly explain some of them. Usually changing only these colors will be enough to adjust Piwik’s look to your corporate design or to create a look that pleases you :@theme-color-brand: #d4291f; // The Piwik red which is for instance used in the menu, it also defines the color of buttons, the little arrows and more
@theme-color-brand-contrast: #ffffff; // Contrast color to the Piwik red. Usually you need to change it only in case you define a light brand color. For instance to change the text color of buttons
@theme-color-link: #1e93d1; // The link color which is usually a light blue
@theme-color-widget-title-text: #0d0d0d; // The text and background color of the header of a widget (Dashboard)
@theme-color-widget-title-background: #f2f2f2;
@theme-color-menu-contrast-text: #666666; // The text color of a menu item in the reporting sub menu and the admin menu
@theme-color-menu-contrast-textActive: #0d0d0d; // The text color of an active menu item
@theme-color-menu-contrast-background: #f2f2f2; // The background color of a menu item
@graph-colors-data-series[1-8]: #000000; // The different colors used in graphsMaking the change visible
To make a color or font change actually visible when you reload a page in Piwik you will have to delete the compiled CSS file after each change like this :
rm tmp/assets/asset_manager_global_css.cssPublishing your Theme on the Marketplace
In case you want to share your theme with other Piwik users you can do this by pushing your theme to GitHub and creating a tag. Easy as that. Read more about how to distribute a theme.
Advanced features
Isn’t it easy to create a custom theme ? All we had to do is to change some less variables. We never even created a file ! Of course, based on our API design principle, you can accomplish more if you want. For instance, you can change icons, CSS stylesheets, templates and more.
For further customising your Piwik, you can even change the logo and favicon in the Settings => General settings page.
Would you like to know more about theming ? Go to our Theme guide in the Piwik Developer Zone.
If you have any feedback regarding our APIs or our guides in the Developer Zone feel free to send it to us.
PS : see also this related FAQ : How do I White Label Piwik ?
-
Saying Goodbye To Old Machines
I recently sent a few old machines off for recycling. Both had relevance to the early days of the FATE testing effort. As is my custom, I photographed them (poorly, of course).
First, there’s the PowerPC-based Mac Mini I procured thanks to a Craigslist ad in late 2006. I had plans to develop automated FFmpeg building and testing and was already looking ahead toward testing multiple CPU architectures. Again, this was 2006 and PowerPC wasn’t completely on the outs yet– although Apple’s MacTel transition was in full swing, the entire new generation of video game consoles was based on PowerPC.

Click for larger image
I remember trying to find a Mac Mini PPC on Craigslist. Many were to be found, but all asked more than the price of even a new Mac Mini Intel, always because the seller was leaving all of last year’s applications and perhaps including a monitor, neither of which I needed. Fortunately, I found this bare Mac Mini. Also fortunate was the fact that it was far easier to install Linux on it than the first PowerPC machine I owned.
After FATE operation transitioned away from me, I still kept the machine in service as an edge server and automated backup machine. That is, until the hard drive failed on reboot one day. Thus, when it was finally time to recycle the computer, I felt it necessary to disassemble the machine and remove the hard drive for possible salvage and then for destruction.
If you’ve ever attempted to upgrade or otherwise service this style of Mac Mini, you will no doubt recognize the pictured paint scraper tool as standard kit. I have had that tool since I first endeavored to upgrade the RAM to 1 GB from the standard 1/2 GB. Performing such activities on a Mac Mini is tedious, but only if you care about putting it back together afterwards.
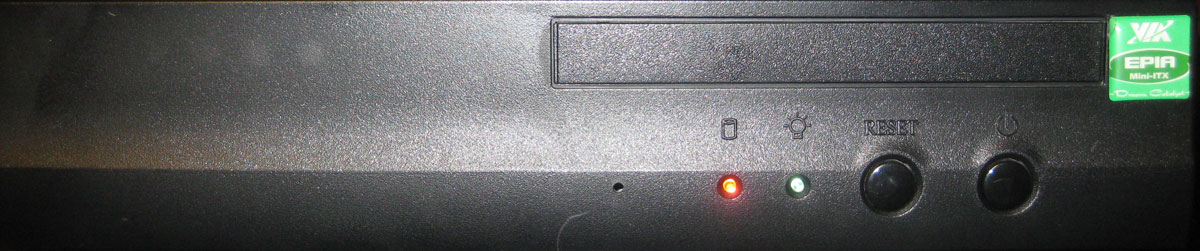
The next machine is a bit older. I put it together nearly a decade ago, early in 2005. This machine’s original duty was “download agent”– this would be more specifically called a BitTorrent machine in modern tech parlance. Back then, I placed it on someone else’s woefully underutilized home broadband connection (with their permission, of course) when I was too cheap to upgrade from dialup.

Click for larger image
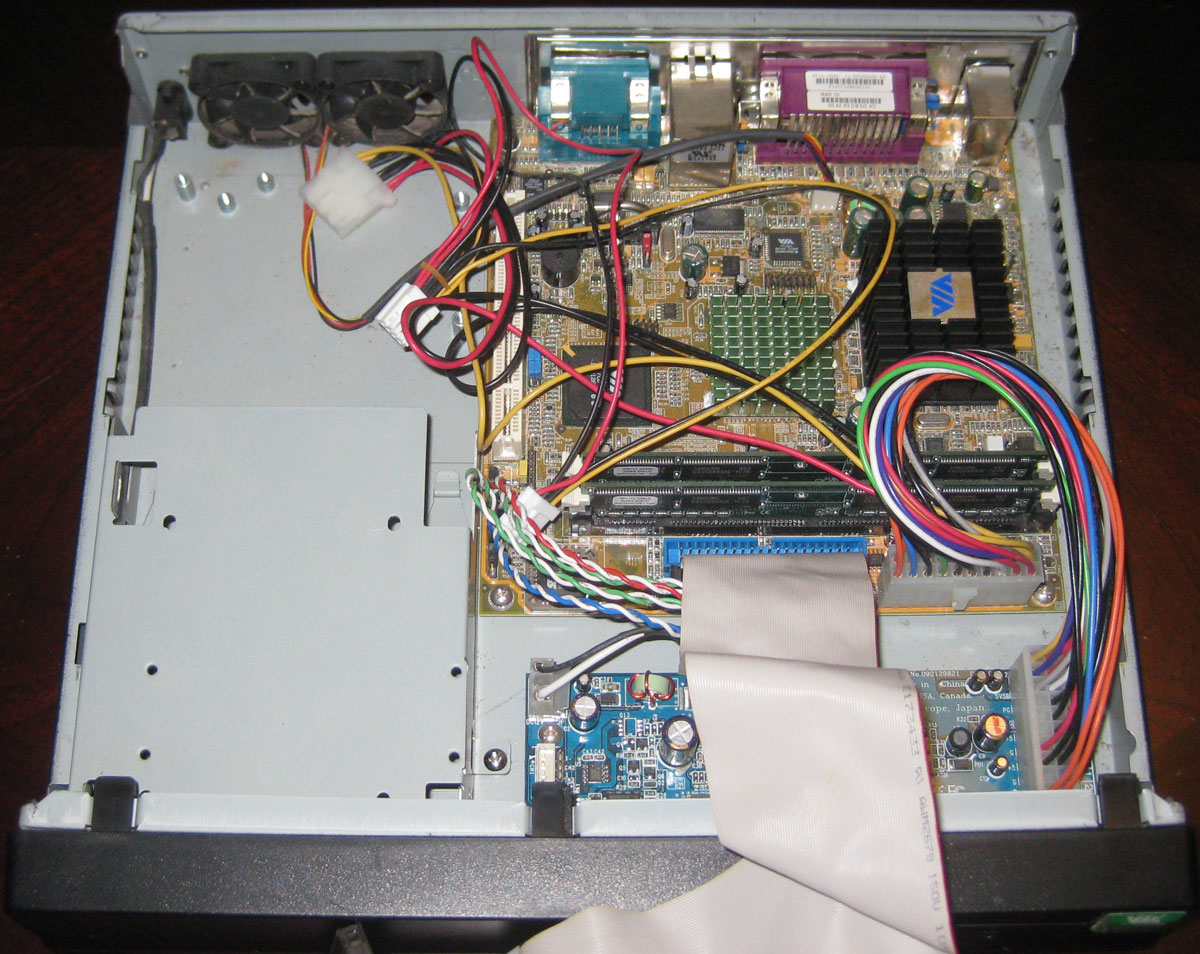
This is a small form factor system from VIA that was clearly designed with home theater PC (HTPC) use cases in mind. It has a VIA C3 x86-compatible CPU (according to my notes, Centaur VIA Samuel 2 stepping 03, flags : fpu de tsc msr cx8 mtrr pge mmx 3dnow) and 128 MB of RAM (initially ; I upgraded it to 512 MB some years later, just for the sake of doing it). And then there was the 120 GB PATA HD for all that downloaded goodness.

Click for larger image
I have specific memories of a time when my main computer at home wasn’t working correctly for one reason or another. Instead, I logged into this machine remotely via SSH to make several optimizations and fixes on FFmpeg’s VP3/Theora video decoder, all from the terminal, without being able to see the decoded images with my own eyes (which is why I insist that even blind people could work on video codecs).
By the time I got my own broadband, I had become inspired to attempt the automated build and test system for FFmpeg. This was the machine I used for prototyping early brainstorms of FATE. By the time I put a basic build/test system into place in early 2008, I had much faster computers that could build and test the project– obvious limitation of this machine is that it could take at least 1/2 hour to build the entire codebase, and that was the project from 8 years ago.
So the machine got stuffed in a closet somewhere along the line. The next time I pulled it out was in 2010 when I wanted to toy with Dreamcast programming once more (the machine appears in one of the photos in this post). This was the only machine I still owned which still had an RS-232 serial port (I didn’t know much about USB serial converters yet), plus it still had a bunch of pre-compiled DC homebrew binaries (I was having trouble getting the toolchain to work right).
The next time I dusted off this machine was late last year when I was trying some experiments with the Microsoft Xbox’s IDE drive (a photo in that post also shows the machine ; this thing shows up a lot on this blog). The VIA machine was the only machine I still owned which had 40-pin IDE connectors which was crucial to my experiment.
At this point, I was trying to make the machine more useful which meant replacing the ancient Gentoo Linux distribution as well as simply interacting with it via a keyboard and mouse. I have a long Evernote entry documenting a comedy of errors revolving around this little box. The interaction troubles were due to the fact that I didn’t have any PS/2 keyboards left and I couldn’t make a USB keyboard work with it. Diego was able to explain that I needed to flip a bit in the BIOS to address this which worked. As for upgrading the OS, I tried numerous Linux distributions large and small, mostly focusing on the small. None worked. I eventually learned that, while I was trying to use i686 distributions, this machine did not actually qualify as an i686 CPU ; installations usually booted but failed because the default kernel required the cmov instruction. I was advised to try i386 distros instead. My notes don’t indicate whether I had any luck on this front before I gave up and moved on.
I just made the connection that this VIA machine has two 40-pin IDE connectors which means that the thing was technically capable of supporting up to 4 IDE devices. Obviously, the computer couldn’t really accommodate that in terms of space or power. When I wanted to try installing a new OS, I needed take off the top and connect a rather bulky IDE CD-ROM drive. This computer’s casing was supposed to be able to support a slimline optical drive (perhaps like the type found in laptops), but I could never quite visualize how that was supposed to work, space-wise. When I disassembled the PowerPC Mac Mini, I realized I might be able to repurpose that machines optical drive for this computer. Obviously, I thought better of trying since both machines are off to the recycle pile.
I would still like to work on the Xbox project a bit more, but I procured a different, unused, much more powerful yet still old computer that has a motherboard with 1 PATA connector in addition to 6 SATA connectors. If I ever get around to toying with Linux kernel development, this should be a much more appropriate platform to use.
I thought about turning this machine into an old Windows XP (and lower, down to Windows 3.1) gaming platform ; the capabilities of the machine would probably be perfect for a huge portion of my Windows game collection. But I think the lack of an optical drive renders this idea intractable. External USB drives are likely out of the question since there is very little chance that this motherboard featured USB 2.0 (the specs don’t mention 2.0, so the USB ports are probably 1.1).
So it is with fond memories that I send off both machines, sans hard drives, to the recycle pile. I’m still deciding on an appropriate course of action for failed hard drives, though.
-
How to get .mp4 videos from motion on a Raspberry Pi ?
9 octobre 2016, par MaartiI use motion on my laptop and it works perfectly in any format. But when I use it on my Raspberry Pi 3 (Raspbian Jessie) with the Raspberry Camera V2, the only formats that work are :
.aviand.swf.When I choose any other format, the output video is a "0 sec video" that is played and closed instantly.
I would like to have
.mp4or.oggoutput so I can read it easily with HTML5.Here is the motion codec documentation.
Here is my config file :
############################################################

# Daemon

############################################################


# Start in daemon (background) mode and release terminal (default: off)

daemon on


# File to store the process ID, also called pid file. (default: not defined)

process_id_file /var/run/motion/motion.pid


############################################################

# Basic Setup Mode

############################################################


# Start in Setup-Mode, daemon disabled. (default: off)

setup_mode off


# Use a file to save logs messages, if not defined stderr and syslog is used. (default: not defined)

#logfile /mnt/camshare/Cam1/motion.log

logfile /tmp/motion.log


# Level of log messages [1..9] (EMR, ALR, CRT, ERR, WRN, NTC, INF, DBG, ALL). (default: 6 / NTC)

log_level 2


# Filter to log messages by type (COR, STR, ENC, NET, DBL, EVT, TRK, VID, ALL). (default: ALL)

log_type all


###########################################################

# Capture device options

############################################################


# Videodevice to be used for capturing  (default /dev/video0)

# for FreeBSD default is /dev/bktr0

#videodevice /dev/video0


# v4l2_palette allows to choose preferable palette to be use by motion

# to capture from those supported by your videodevice. (default: 17)

# E.g. if your videodevice supports both V4L2_PIX_FMT_SBGGR8 and

# V4L2_PIX_FMT_MJPEG then motion will by default use V4L2_PIX_FMT_MJPEG.

# Setting v4l2_palette to 2 forces motion to use V4L2_PIX_FMT_SBGGR8

# instead.

#

# Values :

# V4L2_PIX_FMT_SN9C10X : 0  'S910'

# V4L2_PIX_FMT_SBGGR16 : 1  'BYR2'

# V4L2_PIX_FMT_SBGGR8  : 2  'BA81'

# V4L2_PIX_FMT_SPCA561 : 3  'S561'

# V4L2_PIX_FMT_SGBRG8  : 4  'GBRG'

# V4L2_PIX_FMT_SGRBG8  : 5  'GRBG'

# V4L2_PIX_FMT_PAC207  : 6  'P207'

# V4L2_PIX_FMT_PJPG    : 7  'PJPG'

# V4L2_PIX_FMT_MJPEG   : 8  'MJPEG'

# V4L2_PIX_FMT_JPEG    : 9  'JPEG'

# V4L2_PIX_FMT_RGB24   : 10 'RGB3'

# V4L2_PIX_FMT_SPCA501 : 11 'S501'

# V4L2_PIX_FMT_SPCA505 : 12 'S505'

# V4L2_PIX_FMT_SPCA508 : 13 'S508'

# V4L2_PIX_FMT_UYVY    : 14 'UYVY'

# V4L2_PIX_FMT_YUYV    : 15 'YUYV'

# V4L2_PIX_FMT_YUV422P : 16 '422P'

# V4L2_PIX_FMT_YUV420  : 17 'YU12'

#

v4l2_palette 7


# Tuner device to be used for capturing using tuner as source (default /dev/tuner0)

# This is ONLY used for FreeBSD. Leave it commented out for Linux

; tunerdevice /dev/tuner0


# The video input to be used (default: -1)

# Should normally be set to 0 or 1 for video/TV cards, and -1 for USB cameras

input -1


# The video norm to use (only for video capture and TV tuner cards)

# Values: 0 (PAL), 1 (NTSC), 2 (SECAM), 3 (PAL NC no colour). Default: 0 (PAL)

norm 0


# The frequency to set the tuner to (kHz) (only for TV tuner cards) (default: 0)

frequency 0


# Rotate image this number of degrees. The rotation affects all saved images as

# well as movies. Valid values: 0 (default = no rotation), 90, 180 and 270.

rotate 0


# Image width (pixels). Valid range: Camera dependent, default: 352

#width 1024

width 640


# Image height (pixels). Valid range: Camera dependent, default: 288

#height 576

height 480


# Maximum number of frames to be captured per second.

# Valid range: 2-100. Default: 100 (almost no limit).

framerate 15


# Minimum time in seconds between capturing picture frames from the camera.

# Default: 0 = disabled - the capture rate is given by the camera framerate.

# This option is used when you want to capture images at a rate lower than 2 per second.

minimum_frame_time 0


# URL to use if you are using a network camera, size will be autodetected (incl http:// ftp:// mjpg:// or file:///)

# Must be a URL that returns single jpeg pictures or a raw mjpeg stream. Default: Not defined

;netcam_url http://127.0.0.1/cgi-bin/raspicam.sh


# Username and password for network camera (only if required). Default: not defined

# Syntax is user:password

; netcam_userpass value


# The setting for keep-alive of network socket, should improve performance on compatible net cameras.

# off:   The historical implementation using HTTP/1.0, closing the socket after each http request.

# force: Use HTTP/1.0 requests with keep alive header to reuse the same connection.

# on:    Use HTTP/1.1 requests that support keep alive as default.

# Default: off

netcam_keepalive off


# URL to use for a netcam proxy server, if required, e.g. "http://myproxy".

# If a port number other than 80 is needed, use "http://myproxy:1234".

# Default: not defined

; netcam_proxy value


# Set less strict jpeg checks for network cameras with a poor/buggy firmware.

# Default: off

netcam_tolerant_check off


# Let motion regulate the brightness of a video device (default: off).

# The auto_brightness feature uses the brightness option as its target value.

# If brightness is zero auto_brightness will adjust to average brightness value 128.

# Only recommended for cameras without auto brightness

auto_brightness off


# Set the initial brightness of a video device.

# If auto_brightness is enabled, this value defines the average brightness level

# which Motion will try and adjust to.

# Valid range 0-255, default 0 = disabled

brightness 0


# Set the contrast of a video device.

# Valid range 0-255, default 0 = disabled

contrast 0


# Set the saturation of a video device.

# Valid range 0-255, default 0 = disabled

saturation 0


# Set the hue of a video device (NTSC feature).

# Valid range 0-255, default 0 = disabled

hue 0


############################################################

# File "camera" support - read raw YUV data from a file

############################################################

#filecam_path /home/pi/test-cap/motion-mmal.capture


############################################################

# OpenMax/MMAL camera support for Raspberry Pi

############################################################

mmalcam_name vc.ril.camera

#mmalcam_control_params

#mmalcam_raw_capture_file /home/pi/motion-mmal.capture


# Switch this setting to "on" to use the still image mode of the Pi's camera

# instead of video. This gives a wider field of view, but requires

# a much slower frame-rate to achieve exposure stability

# (e.g. 0.25 fps or slower). You can use the minimum_frame_time

# parameter above to achieve this


mmalcam_use_still off


############################################################

# Round Robin (multiple inputs on same video device name)

############################################################


# Number of frames to capture in each roundrobin step (default: 1)

roundrobin_frames 1


# Number of frames to skip before each roundrobin step (default: 1)

roundrobin_skip 1


# Try to filter out noise generated by roundrobin (default: off)

switchfilter off


############################################################

# Motion Detection Settings:

############################################################


# Threshold for number of changed pixels in an image that

# triggers motion detection (default: 1500)

threshold 1500


# Automatically tune the threshold down if possible (default: off)

threshold_tune off


# Noise threshold for the motion detection (default: 32)

noise_level 32


# Automatically tune the noise threshold (default: on)

noise_tune on


# Despeckle motion image using (e)rode or (d)ilate or (l)abel (Default: not defined)

# Recommended value is EedDl. Any combination (and number of) of E, e, d, and D is valid.

# (l)abeling must only be used once and the 'l' must be the last letter.

# Comment out to disable

despeckle_filter EedDl


# Detect motion in predefined areas (1 - 9). Areas are numbered like that:  1 2 3

# A script (on_area_detected) is started immediately when motion is         4 5 6

# detected in one of the given areas, but only once during an event.        7 8 9

# One or more areas can be specified with this option. Take care: This option

# does NOT restrict detection to these areas! (Default: not defined)

; area_detect value


# PGM file to use as a sensitivity mask.

# Full path name to. (Default: not defined)

; mask_file value


# Dynamically create a mask file during operation (default: 0)

# Adjust speed of mask changes from 0 (off) to 10 (fast)

smart_mask_speed 0


# Ignore sudden massive light intensity changes given as a percentage of the picture

# area that changed intensity. Valid range: 0 - 100 , default: 0 = disabled

lightswitch 0


# Picture frames must contain motion at least the specified number of frames

# in a row before they are detected as true motion. At the default of 1, all

# motion is detected. Valid range: 1 to thousands, recommended 1-5

minimum_motion_frames 1


# Specifies the number of pre-captured (buffered) pictures from before motion

# was detected that will be output at motion detection.

# Recommended range: 0 to 5 (default: 0)

# Do not use large values! Large values will cause Motion to skip video frames and

# cause unsmooth movies. To smooth movies use larger values of post_capture instead.

pre_capture 2


# Number of frames to capture after motion is no longer detected (default: 0)

post_capture 2


# Event Gap is the seconds of no motion detection that triggers the end of an event.

# An event is defined as a series of motion images taken within a short timeframe.

# Recommended value is 60 seconds (Default). The value -1 is allowed and disables

# events causing all Motion to be written to one single movie file and no pre_capture.

# If set to 0, motion is running in gapless mode. Movies don't have gaps anymore. An

# event ends right after no more motion is detected and post_capture is over.

event_gap 60


# Maximum length in seconds of an mpeg movie

# When value is exceeded a new movie file is created. (Default: 0 = infinite)

# ATTENTION: when you're not using the motion build from the tutorial, it might fail with error 'Unknown config option "max_mpeg_time"'

# the use this line instead:

# max_movie_time 60

max_movie_time 60


# Always save images even if there was no motion (default: off)

emulate_motion off


############################################################

# Image File Output

############################################################


# Output 'normal' pictures when motion is detected (default: on)

# Valid values: on, off, first, best, center

# When set to 'first', only the first picture of an event is saved.

# Picture with most motion of an event is saved when set to 'best'.

# Picture with motion nearest center of picture is saved when set to 'center'.

# Can be used as preview shot for the corresponding movie.

output_pictures best


# Output pictures with only the pixels moving object (ghost images) (default: off)

output_debug_pictures off


# The quality (in percent) to be used by the jpeg compression (default: 75)

quality 75


# Type of output images

# Valid values: jpeg, ppm (default: jpeg)

picture_type jpeg


############################################################

# FFMPEG related options

# Film (movies) file output, and deinterlacing of the video input

# The options movie_filename and timelapse_filename are also used

# by the ffmpeg feature

############################################################


# Use ffmpeg to encode movies in realtime (default: off)

ffmpeg_output_movies on


# Use ffmpeg to make movies with only the pixels moving

# object (ghost images) (default: off)

ffmpeg_output_debug_movies off


# Use ffmpeg to encode a timelapse movie

# Default value 0 = off - else save frame every Nth second

ffmpeg_timelapse 0


# The file rollover mode of the timelapse video

# Valid values: hourly, daily (default), weekly-sunday, weekly-monday, monthly, manual

ffmpeg_timelapse_mode daily


# Bitrate to be used by the ffmpeg encoder (default: 400000)

# This option is ignored if ffmpeg_variable_bitrate is not 0 (disabled)

ffmpeg_bps 500000


# Enables and defines variable bitrate for the ffmpeg encoder.

# ffmpeg_bps is ignored if variable bitrate is enabled.

# Valid values: 0 (default) = fixed bitrate defined by ffmpeg_bps,

# or the range 2 - 31 where 2 means best quality and 31 is worst.

ffmpeg_variable_bitrate 5


# Codec to used by ffmpeg for the video compression.

# Timelapse mpegs are always made in mpeg1 format independent from this option.

# Supported formats are: mpeg1 (ffmpeg-0.4.8 only), mpeg4 (default), and msmpeg4.

# mpeg1 - gives you files with extension .mpg

# mpeg4 or msmpeg4 - gives you files with extension .avi

# msmpeg4 is recommended for use with Windows Media Player because

# it requires no installation of codec on the Windows client.

# swf - gives you a flash film with extension .swf

# flv - gives you a flash video with extension .flv

# ffv1 - FF video codec 1 for Lossless Encoding ( experimental )

# mov - QuickTime ( testing )

# ogg - Ogg/Theora ( testing )

#ffmpeg_video_codec msmpeg4

ffmpeg_video_codec mp4


# Use ffmpeg to deinterlace video. Necessary if you use an analog camera

# and see horizontal combing on moving objects in video or pictures.

# (default: off)

ffmpeg_deinterlace off


############################################################

# SDL Window

############################################################


# Number of motion thread to show in SDL Window (default: 0 = disabled)

#sdl_threadnr 0


############################################################

# External pipe to video encoder

# Replacement for FFMPEG builtin encoder for ffmpeg_output_movies only.

# The options movie_filename and timelapse_filename are also used

# by the ffmpeg feature

#############################################################


# Bool to enable or disable extpipe (default: off)

use_extpipe off


# External program (full path and opts) to pipe raw video to

# Generally, use '-' for STDIN...

;extpipe mencoder -demuxer rawvideo -rawvideo w=320:h=240:i420 -ovc x264 -x264encopts bframes=4:frameref=1:subq=1:scenecut=-1:nob_adapt:threads=1:keyint=1000:8x8dct:vbv_bufsize=4000:crf=24:partitions=i8x8,i4x4:vbv_maxrate=800:no-chroma-me -vf denoise3d=16:12:48:4,pp=lb -of   avi -o %f.avi - -fps %fps


############################################################

# Snapshots (Traditional Periodic Webcam File Output)

############################################################


# Make automated snapshot every N seconds (default: 0 = disabled)

snapshot_interval 0


############################################################

# Text Display

# %Y = year, %m = month, %d = date,

# %H = hour, %M = minute, %S = second, %T = HH:MM:SS,

# %v = event, %q = frame number, %t = thread (camera) number,

# %D = changed pixels, %N = noise level, \n = new line,

# %i and %J = width and height of motion area,

# %K and %L = X and Y coordinates of motion center

# %C = value defined by text_event - do not use with text_event!

# You can put quotation marks around the text to allow

# leading spaces

############################################################


# Locate and draw a box around the moving object.

# Valid values: on, off, preview (default: off)

# Set to 'preview' will only draw a box in preview_shot pictures.

locate_motion_mode off


# Set the look and style of the locate box if enabled.

# Valid values: box, redbox, cross, redcross (default: box)

# Set to 'box' will draw the traditional box.

# Set to 'redbox' will draw a red box.

# Set to 'cross' will draw a little cross to mark center.

# Set to 'redcross' will draw a little red cross to mark center.

locate_motion_style box


# Draws the timestamp using same options as C function strftime(3)

# Default: %Y-%m-%d\n%T = date in ISO format and time in 24 hour clock

# Text is placed in lower right corner

text_right %d.%m.%Y\n%T


# Draw a user defined text on the images using same options as C function strftime(3)

# Default: Not defined = no text

# Text is placed in lower left corner

; text_left CAMERA %t

text_left HofCam


# Draw the number of changed pixed on the images (default: off)

# Will normally be set to off except when you setup and adjust the motion settings

# Text is placed in upper right corner

text_changes off


# This option defines the value of the special event conversion specifier %C

# You can use any conversion specifier in this option except %C. Date and time

# values are from the timestamp of the first image in the current event.

# Default: %Y%m%d%H%M%S

# The idea is that %C can be used filenames and text_left/right for creating

# a unique identifier for each event.

text_event %Y%m%d%H%M%S


# Draw characters at twice normal size on images. (default: off)

text_double on


# Text to include in a JPEG EXIF comment

# May be any text, including conversion specifiers.

# The EXIF timestamp is included independent of this text.

;exif_text %i%J/%K%L


############################################################

# Target Directories and filenames For Images And Films

# For the options snapshot_, picture_, movie_ and timelapse_filename

# you can use conversion specifiers

# %Y = year, %m = month, %d = date,

# %H = hour, %M = minute, %S = second,

# %v = event, %q = frame number, %t = thread (camera) number,

# %D = changed pixels, %N = noise level,

# %i and %J = width and height of motion area,

# %K and %L = X and Y coordinates of motion center

# %C = value defined by text_event

# Quotation marks round string are allowed.

############################################################


# Target base directory for pictures and films

# Recommended to use absolute path. (Default: current working directory)

target_dir /home/pi


# File path for snapshots (jpeg or ppm) relative to target_dir

# Default: %v-%Y%m%d%H%M%S-snapshot

# Default value is equivalent to legacy oldlayout option

# For Motion 3.0 compatible mode choose: %Y/%m/%d/%H/%M/%S-snapshot

# File extension .jpg or .ppm is automatically added so do not include this.

# Note: A symbolic link called lastsnap.jpg created in the target_dir will always

# point to the latest snapshot, unless snapshot_filename is exactly 'lastsnap'

snapshot_filename %v-%Y%m%d%H%M%S-snapshot


# File path for motion triggered images (jpeg or ppm) relative to target_dir

# Default: %v-%Y%m%d%H%M%S-%q

# Default value is equivalent to legacy oldlayout option

# For Motion 3.0 compatible mode choose: %Y/%m/%d/%H/%M/%S-%q

# File extension .jpg or .ppm is automatically added so do not include this

# Set to 'preview' together with best-preview feature enables special naming

# convention for preview shots. See motion guide for details

picture_filename %v-%Y%m%d%H%M%S-%q


# File path for motion triggered ffmpeg films (movies) relative to target_dir

# Default: %v-%Y%m%d%H%M%S

# Default value is equivalent to legacy oldlayout option

# For Motion 3.0 compatible mode choose: %Y/%m/%d/%H%M%S

# File extension .mpg or .avi is automatically added so do not include this

# This option was previously called ffmpeg_filename

movie_filename %v-%Y%m%d%H%M%S


# File path for timelapse movies relative to target_dir

# Default: %Y%m%d-timelapse

# Default value is near equivalent to legacy oldlayout option

# For Motion 3.0 compatible mode choose: %Y/%m/%d-timelapse

# File extension .mpg is automatically added so do not include this

timelapse_filename %Y%m%d-timelapse


############################################################

# Global Network Options

############################################################

# Enable or disable IPV6 for http control and stream (default: off )

ipv6_enabled off


############################################################

# Live Stream Server

############################################################


# The mini-http server listens to this port for requests (default: 0 = disabled)

stream_port 8080


# Quality of the jpeg (in percent) images produced (default: 50)

stream_quality 50


# Output frames at 1 fps when no motion is detected and increase to the

# rate given by stream_maxrate when motion is detected (default: off)

stream_motion on


# Maximum framerate for stream streams (default: 1)

stream_maxrate 4


# Restrict stream connections to localhost only (default: on)

stream_localhost off


# Limits the number of images per connection (default: 0 = unlimited)

# Number can be defined by multiplying actual stream rate by desired number of seconds

# Actual stream rate is the smallest of the numbers framerate and stream_maxrate

stream_limit 0


# Set the authentication method (default: 0)

# 0 = disabled

# 1 = Basic authentication

# 2 = MD5 digest (the safer authentication)

stream_auth_method 0


# Authentication for the stream. Syntax username:password

# Default: not defined (Disabled)

; stream_authentication username:password


############################################################

# HTTP Based Control

############################################################


# TCP/IP port for the http server to listen on (default: 0 = disabled)

webcontrol_port 8081


# Restrict control connections to localhost only (default: on)

webcontrol_localhost off


# Output for http server, select off to choose raw text plain (default: on)

webcontrol_html_output on


# Authentication for the http based control. Syntax username:password

# Default: not defined (Disabled)

; webcontrol_authentication username:password


############################################################

# Tracking (Pan/Tilt)

#############################################################


# Type of tracker (0=none (default), 1=stepper, 2=iomojo, 3=pwc, 4=generic, 5=uvcvideo, 6=servo)

# The generic type enables the definition of motion center and motion size to

# be used with the conversion specifiers for options like on_motion_detected

track_type 0


# Enable auto tracking (default: off)

track_auto off


# Serial port of motor (default: none)

;track_port /dev/ttyS0


# Motor number for x-axis (default: 0)

;track_motorx 0


# Set motorx reverse (default: 0)

;track_motorx_reverse 0


# Motor number for y-axis (default: 0)

;track_motory 1


# Set motory reverse (default: 0)

;track_motory_reverse 0


# Maximum value on x-axis (default: 0)

;track_maxx 200


# Minimum value on x-axis (default: 0)

;track_minx 50


# Maximum value on y-axis (default: 0)

;track_maxy 200


# Minimum value on y-axis (default: 0)

;track_miny 50


# Center value on x-axis (default: 0)

;track_homex 128


# Center value on y-axis (default: 0)

;track_homey 128


# ID of an iomojo camera if used (default: 0)

track_iomojo_id 0


# Angle in degrees the camera moves per step on the X-axis

# with auto-track (default: 10)

# Currently only used with pwc type cameras

track_step_angle_x 10


[...]